|
|
|
|
|
|
|
|
|
|
|
|

|
|
|
|
|
|
|
|
|
|
|
|

|
|
|
|
|
|
|
|
|
|
|
|
This page and related photos are credited to Zade Faraj as is noted on:
http://www.club202.com/forums/showthread.php?s=&threadid=12406&highlight=removal.
Kropf takes absolutely no responsibility for any use of this information.
Use solely at your own risk and/or enjoyment.
With this post, I will detail how I found my vacuum leak, and how I removed my dashboard and all the components to access and correct it. Please read it in full, and note that this is only for reference and may possibly contain errors, missing steps, and, or information specific to my 1995 C280. In other words, I don’t want to be held responsible.
Dash Removal Tools
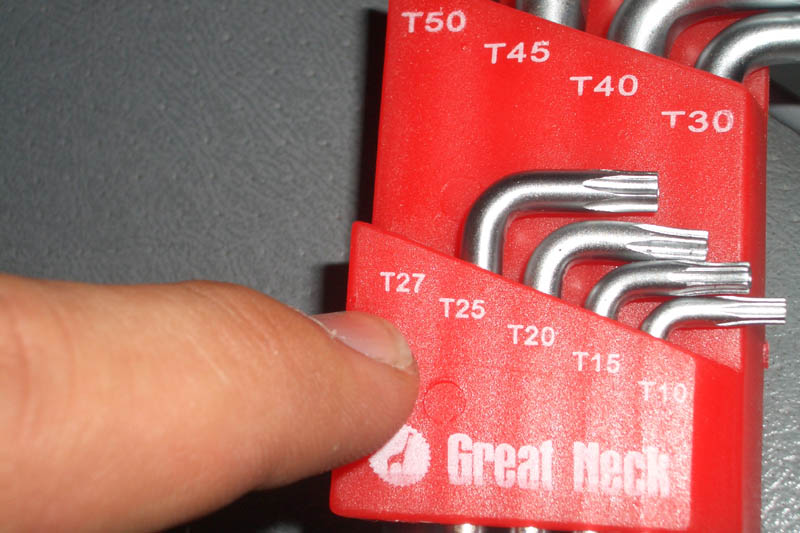
Torx 27 (For Removing Airbag)
1/8” Allen-key style hex socket (For Removing Steering Wheel)
-Preferably the Mercedes Benz dealer tool
-Also, some sort of breaker bar to loosen it.
Smallish sized Flat Head Screwdriver
Medium sized Flat Head Screwdriver
Medium sized Phillips Screwdriver
Preferably a 90 degree head screwdriver
Needle Nose Pliers
Magnet tool
Large and Small sized Socket Set.
-using mainly 8mm sockets.
Stereo removal keys
-Preferably the Mercedes Benz dealer tool,
-Can be substituted for whatever item you can fashion.
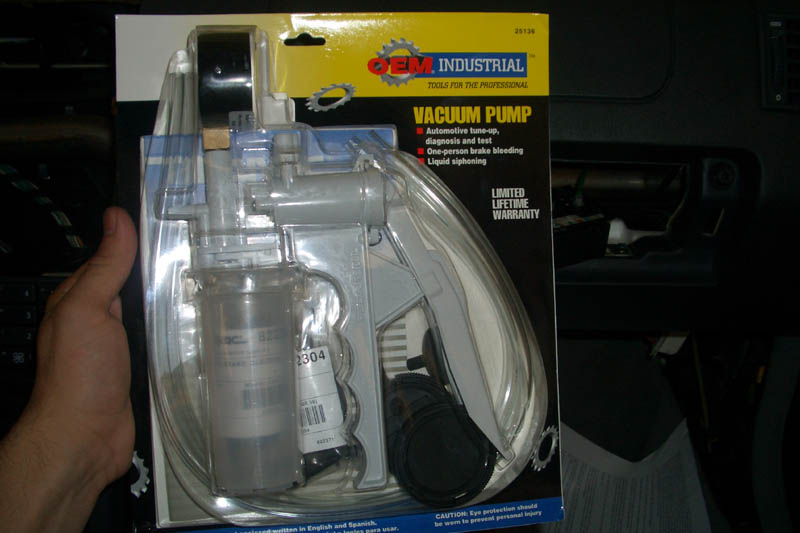
Vacuum Test Pump (if testing for vacuum leak)
-Can be found at AutoZone. Highly Highly recommended!!!
Hi! I am new to the forum and quite new to Mercedes in general. Although I’ve had similar troubles as many other people have had. I have a 95 C280 that has been plagued with technical problems since I’ve had it. I know this was not the pick of the litter, but I’m determined to deal with it. I’ve had Honda’s since I turned 16 and those are a breeze to work on, but the merc has always seemed something out of my realm. Not anymore! Here’s the problem that shouldn’t be all that new to many of you. As I accelerate, the air from the center vents is redirected to the default defroster, and the side vents. Sometimes, upon deceleration, the air will blow from the center vents. This has been going on for two years and it’s time to stop. With this post, I intend to create a large, if not, the largest compilation of information circling this problem that Mercedes should have not let slip by. For starters, I would like to kind of go over what I know just by looking at the system analytically and whatever corrections anyone has, please feel free to let me know so I can make those notations.
From what I can tell, Mercedes has used an expendable resource the engine naturally generates, (vacuum), to help lessen the load on the car, and in many ways, more reliably do work. FWICT (From what I can tell), they decided to integrate the locking mechanism, air circulatory system, 3rd gear shift regulator when the engine is cold, and several other components I have not yet determined, with the use of the vacuum generated. Now, not only is the vacuum generated by the engine itself, there is also a vacuum pump located in the rear passenger side fender well, close to the tail light, that creates a separate vacuum from the engine, in the event the engine is turned off, or the lines do not contain suitable vacuum. (Correct me if I’m wrong).
From many of the posts, I have come to believe that the reason my vents close at certain times, and re-open at different is because of some sort of leak in the vacuum system. Now you have to start tracing this, but where to begin?
Well first of all, it would be good to go over some of the symptoms that include a vacuum leak. Note: I can only assume these symptoms are specifically caused by a vacuum leak inside the cabin. Any other vacuum leak caused outside the cabin may probably cause different effects.
-Air vents cease to operate properly and dysfunction upon acceleration or deceleration, or just do not function properly at all.
-Without turning the engine on, turn the ignition all the way and listen for a whining sound coming from the rear of the car. If the whining you hear is pulsing and ceases only after about 10-15 pulses, you have a leak. If it whines once or twice, there is no apparent leak. If it whines continuously, there is a major leak.
-If your transmission does not shift into 3rd gear until higher rpm’s are reached, when and only when the engine is cold, there could be a leak.
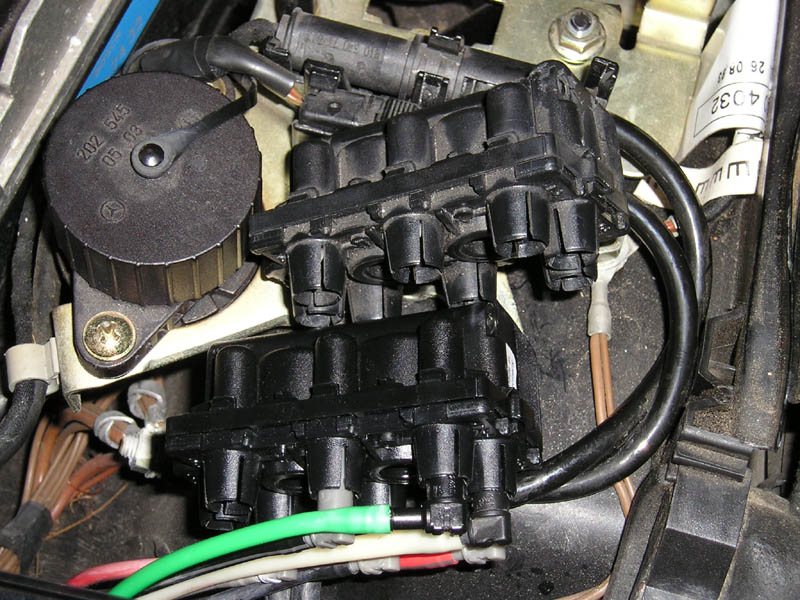
-Remove the plastic cover over the vacuum distributor block in the top passenger quadrant of the engine bay. Without turning the engine on, turn the ignition all the way and quickly go and listen to the vacuum distributor block. If it continues to hiss softly more than 10 times, there is a possible vacuum leak. If it hisses once or twice, there is no apparent leak. If it hisses continuously, there is a major leak. But if the engine is on, it will hiss continuously regardless of a leak, so it is not advised to run this test with the engine on.
______________________________________________________________________
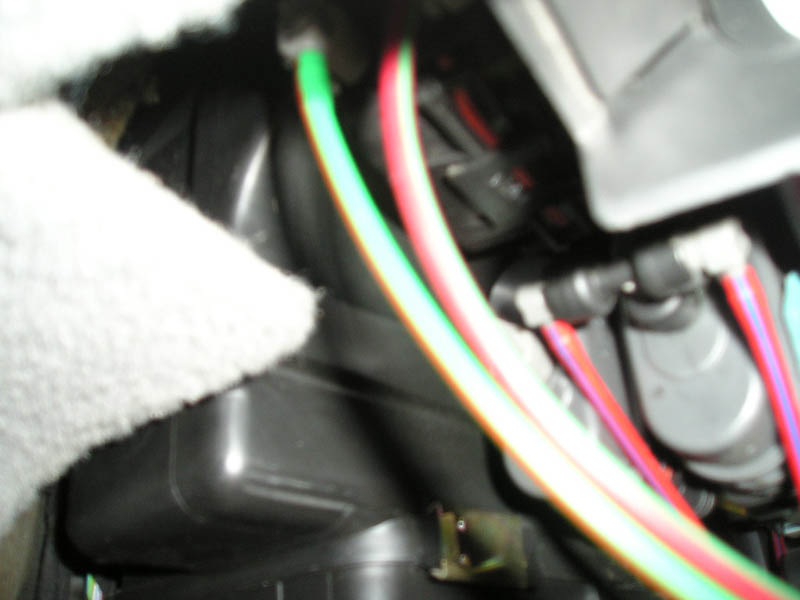
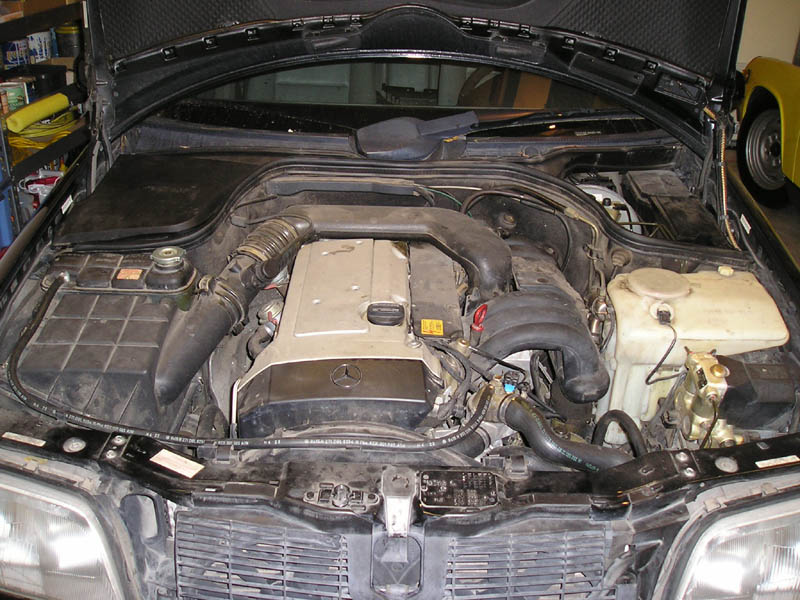
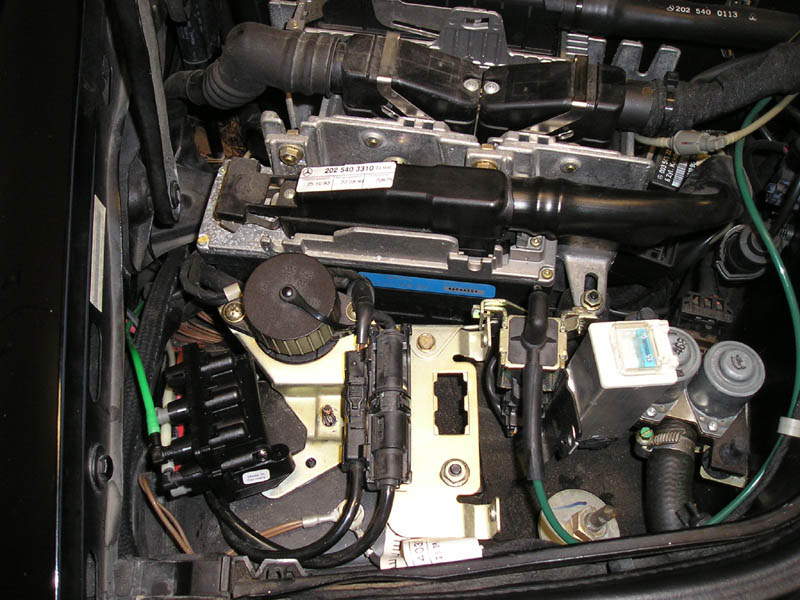
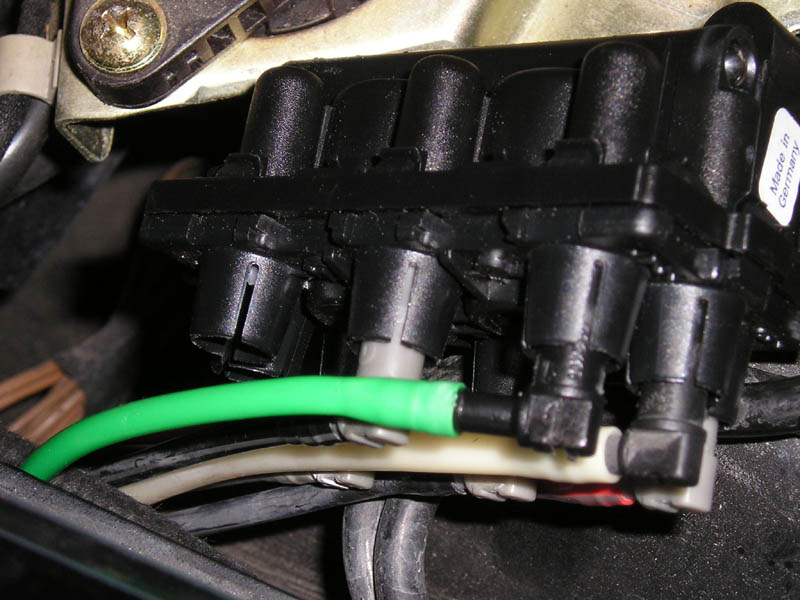
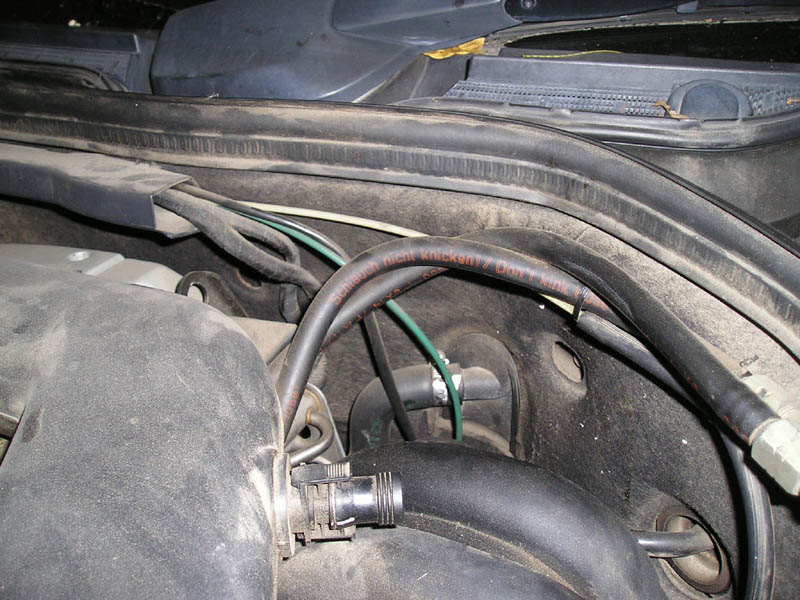
Ok, this is how I began. I started at the front of the vehicle, by removing the cover on the passenger side, by the firewall and exposing the vacuum distributor block. I call it this out of convenience, not because I know what it’s really called. At this junction, the engine’s natural vacuum (light grey line), meets with the vacuum pump from the rear of the car (white line) to be distributed to different parts of the vehicle for different functions.
I began by testing to make sure there was no leak coming from the rear vacuum pump by removing the white vacuum line carefully from the vacuum distributor block by pulling the plastic L connector out of the block with a pair of needle nose pliers. Do not pull the vacuum line out of the L connector because putting the tube back over it is very hard to do. Also, do not break the line because its probably too hard to replace. You must make sure you don’t break the plastic L connector otherwise its $2.00 a piece from the stealership and removing the broken pieces is time consuming. (It happened to me)
-------------------------------if in the event the L connector breaks-------------------------------
Proceed by holding the tube upside down so it the piece doesn’t slide back down the tube further than you can reach. Break the plastic pieces inside with some sort of needle nose pliers by squeezing the outside of the tube, crushing the insides. Then try and use small needle nose pliers or something to pull the pieces out. I squeezed different angles until I heard the plastic break then it was easy to remove the broken shards. Then replace with new L connector (also very hard, try rotating and pushing in at the same time, or even widening the tube with the needle nose plies until it fits snugly over the connector. Just be careful not to crack the tube J
--------------------------------------------------------------------------------------------------------
Starting from the beginning, removing the white vacuum line from the vacuum distributor block will allow you to test to see if the line between the block and the rear pump is free of leaks. I basically had someone turn the ignition on, without starting the car, to hear the whining from the back of the car start pulsing (almost sounds like a Holley fuel pump). With the tube disconnected, it might not even pulse, just a steady stream whine. By placing my finger over the end of the line, I could hear the pump turn off after one more pulse, and from my understanding, this means that the vacuum pressure inside the line has been reached, and that it can cease operation. I sat there for a minute to make sure the pump didn’t start up again, and I did not, until I released my finger from the hole and it started again. To me, that simulated the line was free of leaks.
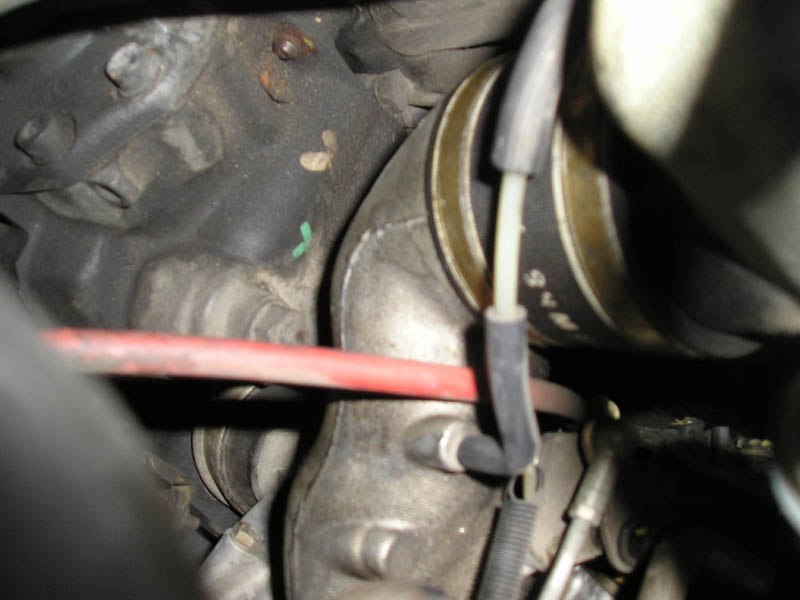
Now, after that, I wanted to make sure the light grey line coming from the engine hadn’t been knocked out during the previous oil filter changes and traced it from the vacuum distribution block in the engine bay to the intake manifold. It’s a bit tricky to get to, but if you follow it with your hand, you can feel it connect to the lower side of the manifold. I made sure it was snugly connected and then began to rule out that as a problem. This can be double checked by removing it from the vacuum distribution block the same way we did the other line and turning the car on to check for vacuum. This should hold vacuum (I am unsure of the psi required, if anyone knows please let me know) But if it does not produce vacuum, their could be serious internal compression problems that I wouldn’t be able to describe.
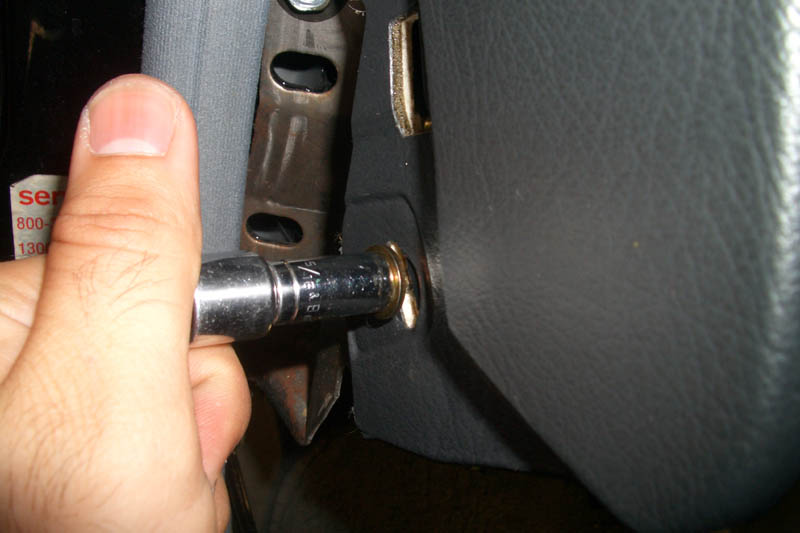
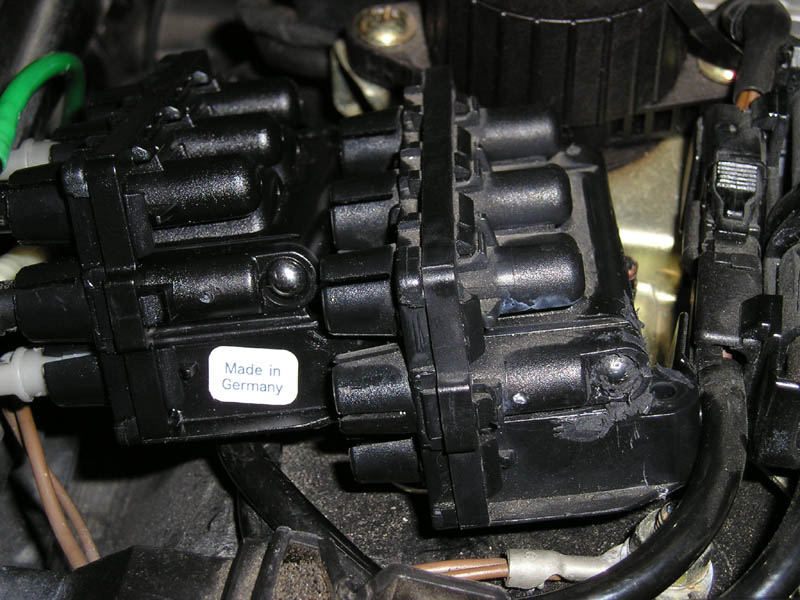
After checking the light grey engine vacuum line, I decided it was time to have a good look at the distribution block itself to determine if a leak could be present on it. Initially, I removed two screws from the gold plate that it was attached to, then carefully picked it up to reveal a screw on the underside of the plate that held the distribution block in place. Using a 90 degree screwdriver, I removed the screw and was able to separate the distribution block from the plate it was attached to and have get a little more movement to check out of the thing. I also noticed how taught the lines were and how the distribution block had warped under the pressure from the lines pulling on it. It was from here that I thought this was definitely a problem, maybe not the root, but definitely a contributing factor. From here on, I will probably fashion something to reattach it to the plate, but with more slack, or just leave it disconnected entirely. Now for the inspection of it..
Oddly enough, my dad had a stethoscope laying around so I used that to listen in for any sort of hiss from a leak, and was actually able to hear a light hiss. (quick jump forward to the future: after replacing it, the hiss was still present until the vacuum pump established adequate vacuum in the lines only when the engine was off, and the ignition was on.) It turned out the hiss didn’t completely sound as if it were coming from a leak, although I might not have been able to hear the difference, but there was a visible crack along the sides by the ball bearing and silicone as if it had been repaired. Many people had commented that checking this distribution block for cracks along or around the ball bearing would be a good start, as this part was quite faulty to begin with.
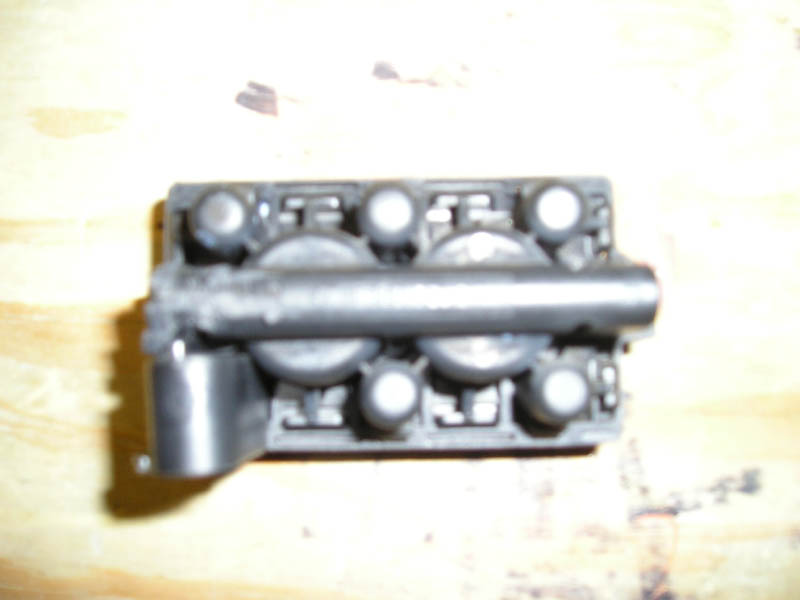
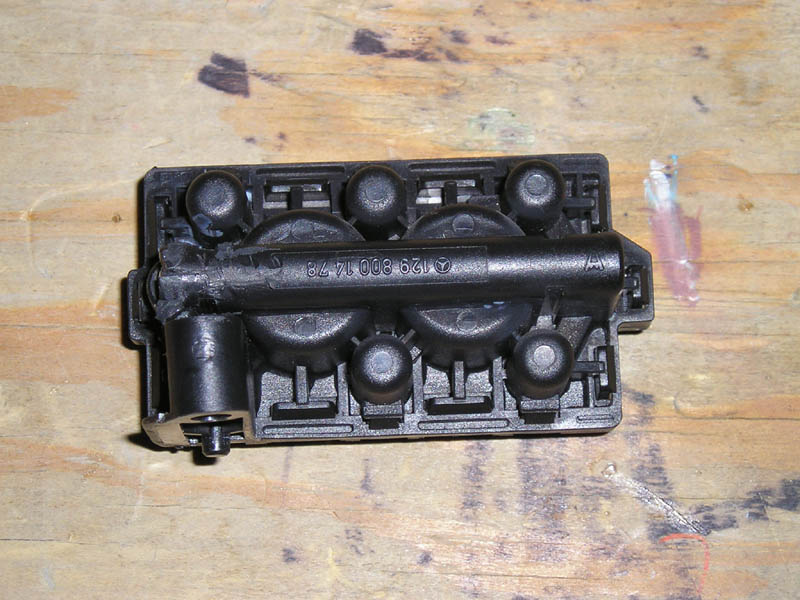
Well.. I went ahead and replaced the distribution block by getting a brand new one from the stealership for a very comfortable price of only $22.00. This was probably the cheapest part I have ever bought from them, so I figured I’d get a few L connectors just incase some of the others decided to snap off. After drawing the positions and colors of the lines on a piece of paper, I figured I could carefully remove the L connectors from the distribution block without forgetting where they went, or breaking them. I put the new one in its place, but did not bolt it down to the plate because I was afraid of how much the vacuum lines would pull on the new part now and in the future because the way it sat was just not right. After replacing the part and putting the lines back in, it was time to check and see if my new distribution block cured my ailing vent problem. As we all know, it did not, and here I am now baffled, but not discouraged. Before, with the old block, when I had the AC compressor on, the cold air would normally come out of the two side vents and the defroster. When I would push the EC button to turn the compressor off, it would come back out of the front. This phenomenon did not occur when I switched to the new block. Regardless as to whether the compressor was on or off, it remained coming out of the side vents and the defroster. This didn’t shed much light at all, so we continue…
I
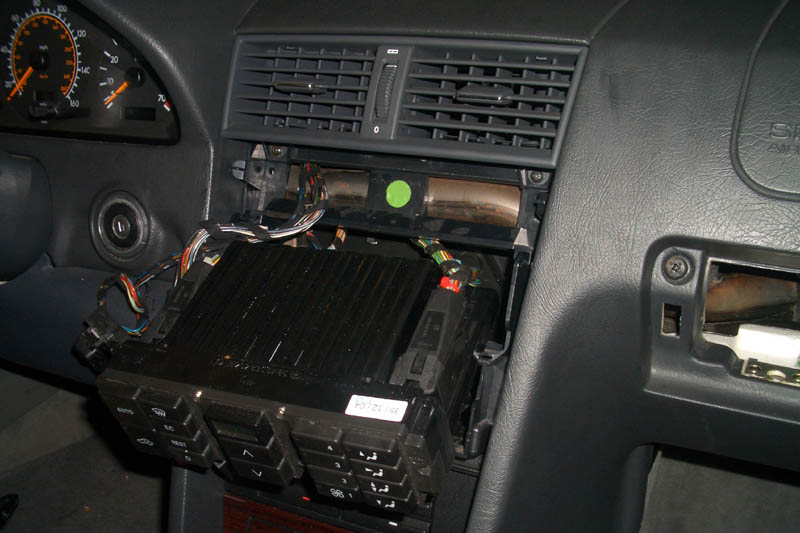
figure, after reading many of the posts, this distribution block sends one
vacuum line over to the cabin, where it is separated somehow and utilized for
the purpose of switching between vents. After looking along the firewall, I
determined the green vacuum line leaving the vacuum distribution block fed the
air circulatory system in the cabin. Also, after reading many of the posts, it
was understood that to view or work on anything, you would have to remove the
miniature glove box and some of the covers above the footwell.
|
|
|
|
|
|
|
|
|
|
|
|
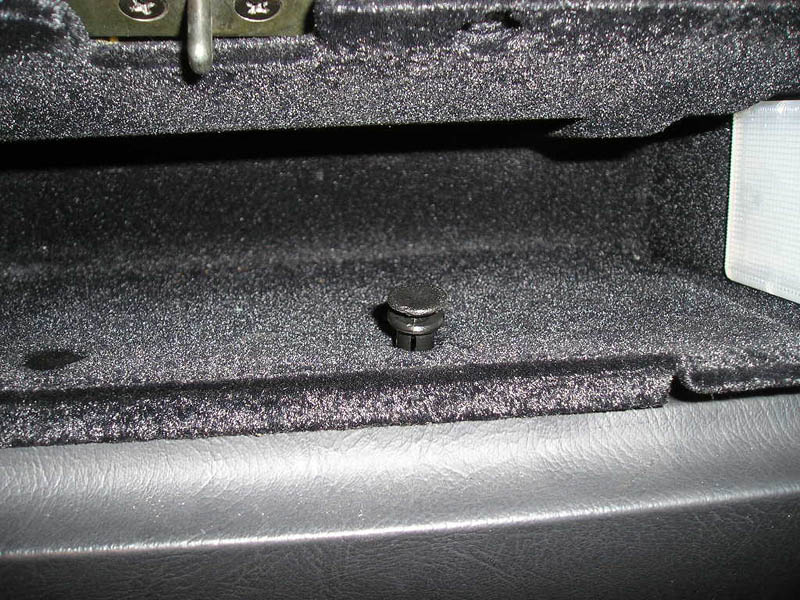
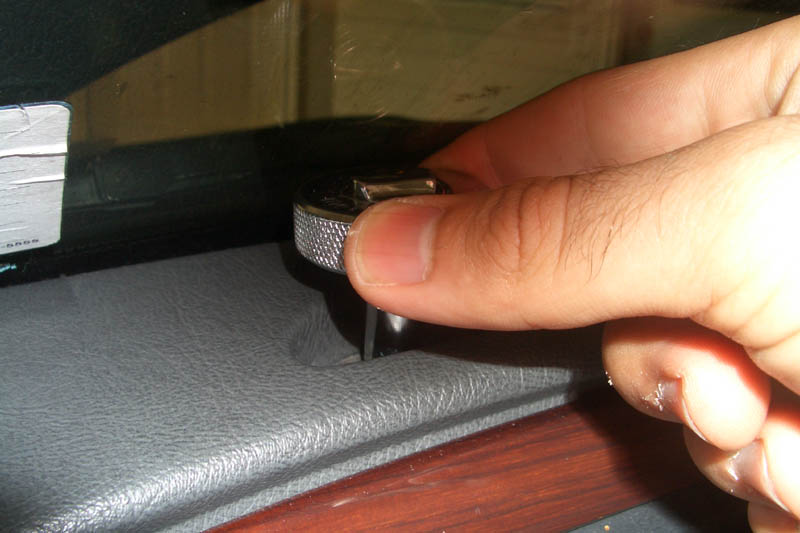
Removing glove box:
I
began by removing the white light in the glove box which came off easily by
prying it from the right side, sliding it out, and disconnecting the cable.
Then, there are 4 small black screw like buttons that need to be removed. By
using a flat head, you can shimmy between the outer ring, and under the inner,
and pry it up to remove the inner piece. Removing the two from the bottom and
two from the top, the strange velvety glove box is now ready to be removed. Its
kind of tricky removing and I was able to yank it out by staring on one side,
then prying it out of the other with the flathead. It takes some work, but
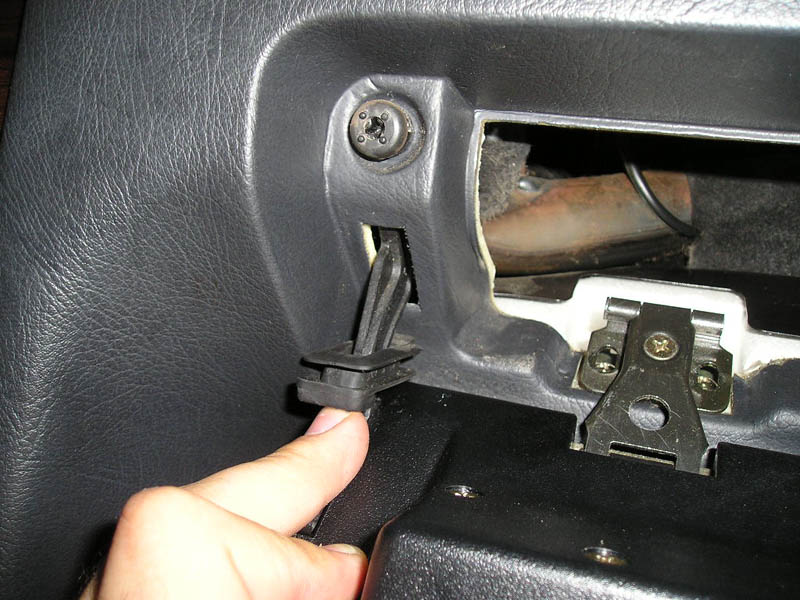
don’t be afraid. After that, I figured I might as well take off the hinged
cover to give myself some working space. (Definitely recommended for future
work) So, remove the two screws from both sides of the hinges, thus loosening
the outer piece. Now, the only thing holding it is the two arms on either
side. Pull out the rubber bushing that these arms sit between so the large
holes are exposed, and push down on the arms from inside the glove box and you
will feel it slide through the hole. Make sure to remember how to put those
back in properly. Repeat this for the other side until it comes out. Now that
the glove box and cover are removed, I like to place the screws back where they
came from so not only do I not lose them, but they are also where they should be
when I put it all back together. Now that I have the glove box out, I can start
removing stuff from underneath to get a good look at what I’m doing.
|
|
|
|
|
|
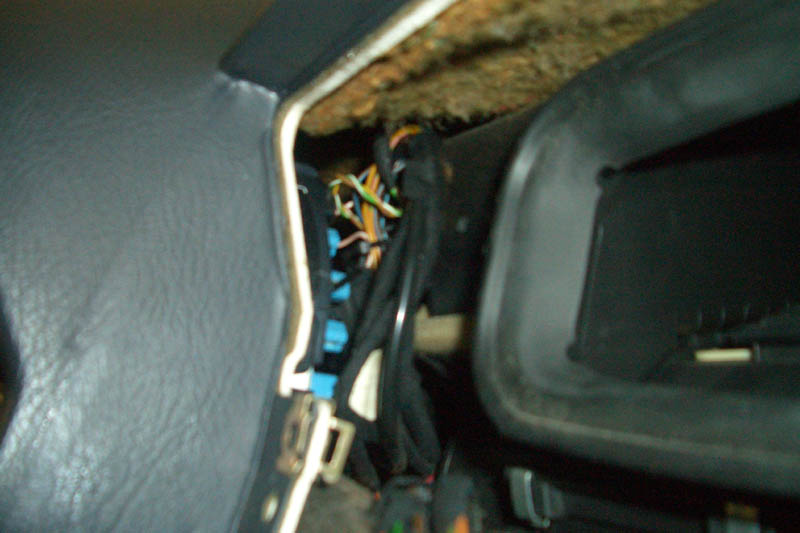
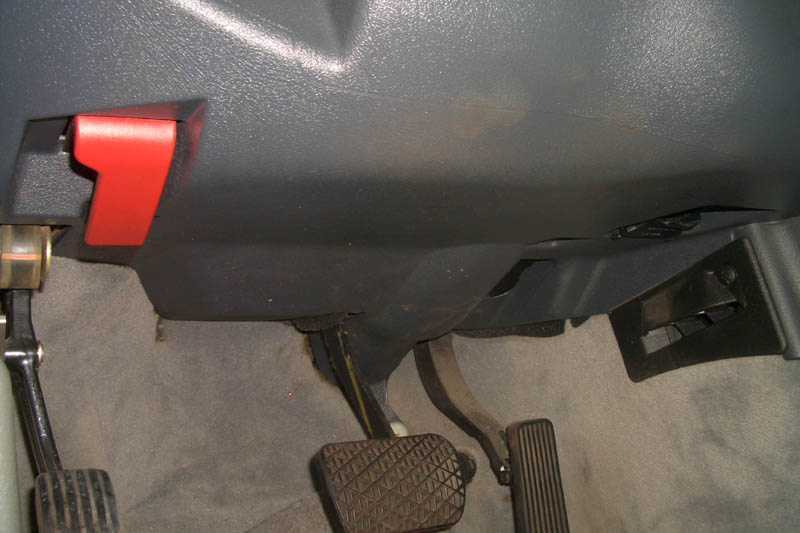
Removing the covers from under the footwell:
I
began by removing the small plastic piece closest to the passengers left foot.
This came off by removing one screw, and allowed for removal of the larger cover
under the glove box. Secondly, I removed that larger piece by unscrewing the 2
screws, and placing it somewhere away from the cramped confines of the footwell.
Finally, I removed the plastic piece that is closest to the passenger’s right
foot. Removing a small cap with a flat head, revealed one screw. Unloosen that
screw and after a few good tugs, you should be able to carefully remove that
piece. Now that the undercarriage section is visible, its time to have a good
look.
|
|
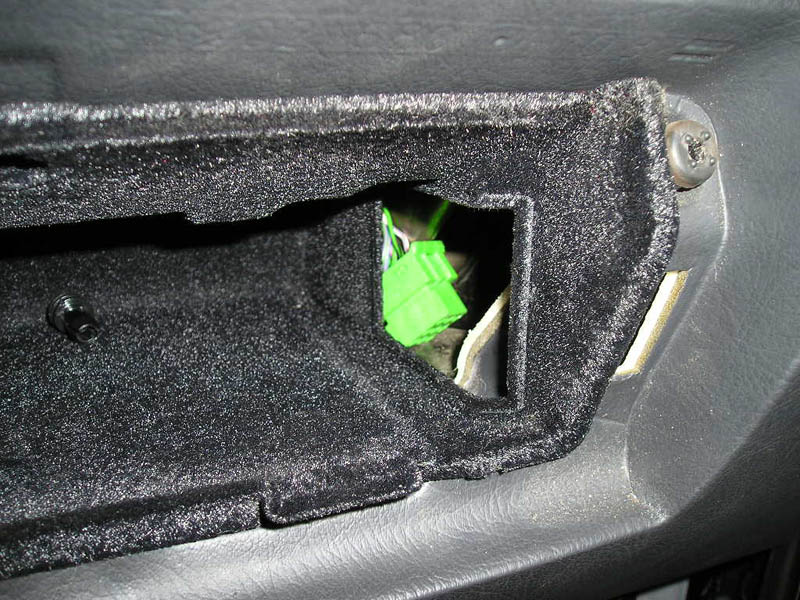
Looking at the cabin
vacuum lines:
When approaching this part, depending on your age, and flexibility, it would be recommended that you adjust your passenger seat, or even remove it, for better access to this area. If not, grab an old pillow and kick your feet onto the headrest and lay back for a bit.
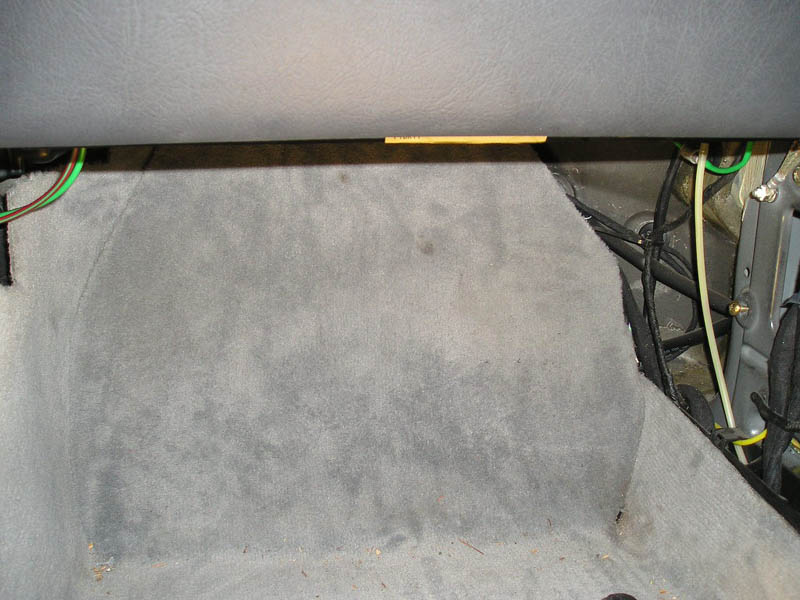
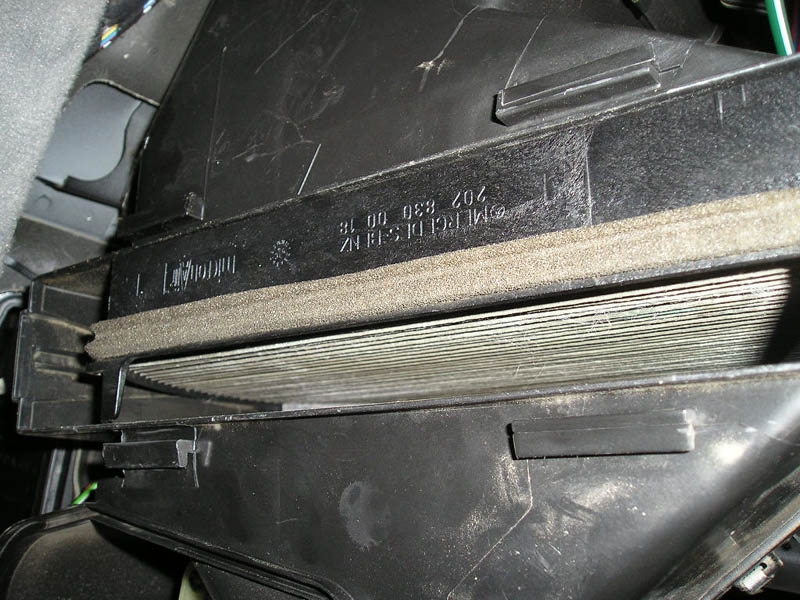
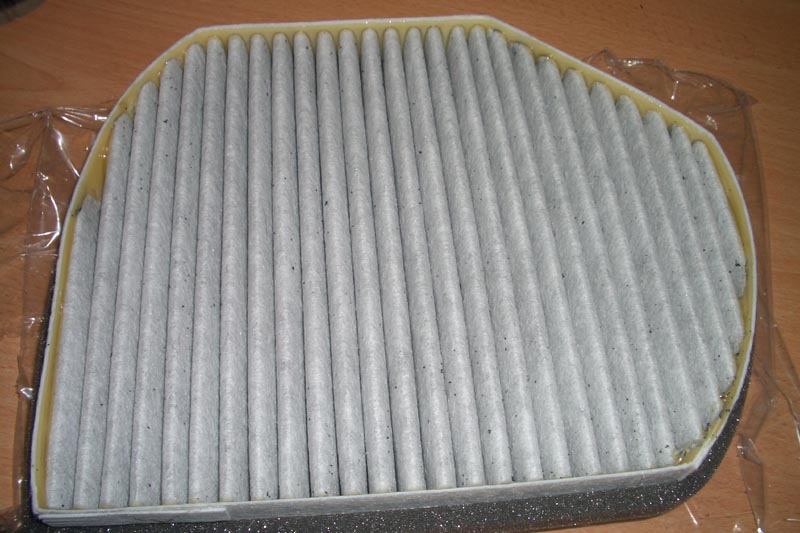
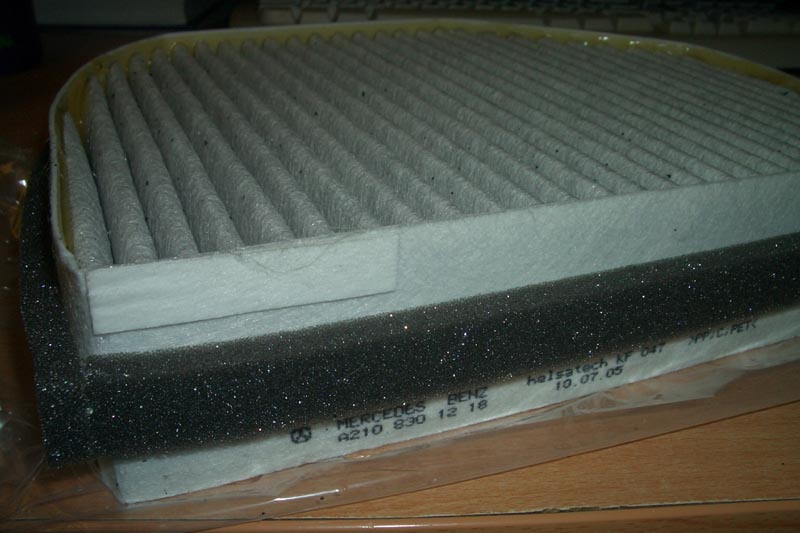
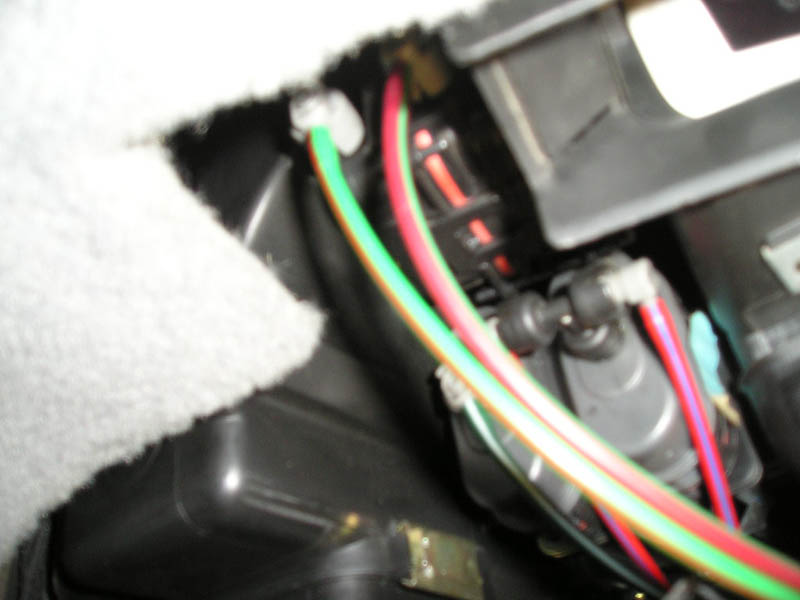
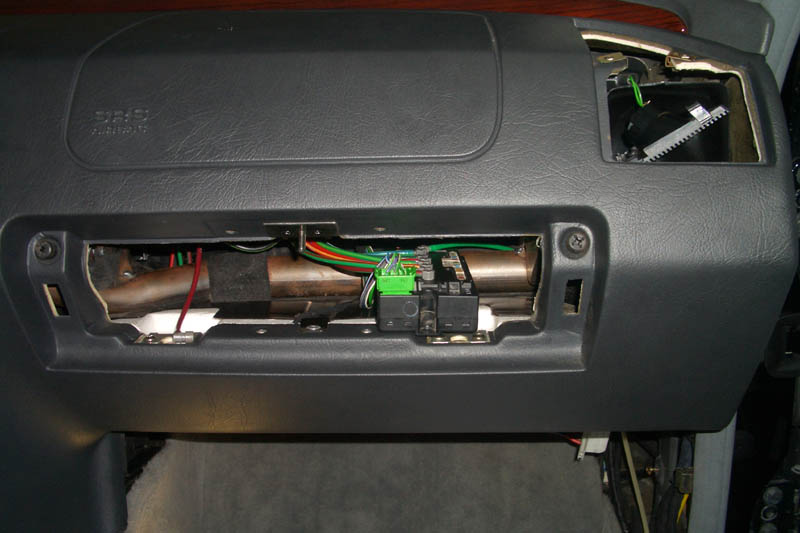
Taking a good look at the cabin in general, it would be a good idea to go ahead
and probably either clean your air filter, or replace it completely. I removed
the larger cover first by sliding the 2 plastic pieces over to one side then
lowering the cover. Inside I found quite a bit of leaves and dirt that had been
able to penetrate my filter, so I took that and cleaned it all out. With that
out, I went ahead and removed the filter by sliding the 2 plastic pieces over,
removing the cover, and dropping the filter out. Along with the filter came a
pile of leaves and sticks. For me, this filters had it, and it’s definitely
worth replacing. (Filter from dealer was $34.00, I probably should have went to
Autozone.) I went ahead and put the covers back, quite sure that the motor and
filter had little to do with my problem now. (Although some have claimed the fan
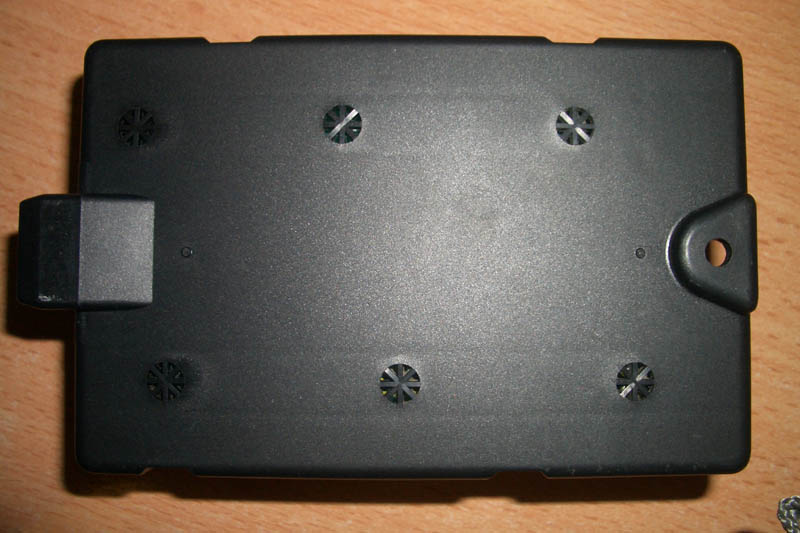
motor could be an issue) Now, connected to the plastic motor housing is a
separate box I determined was the vacuum control unit for the vent system, with
a green connector coming out of it, and multiple vacuum lines connected to it.
It would be best to get a good look at this, so I decided to remove the single
screw that held it in place.
|
|
|
|
|
|
|
|
|
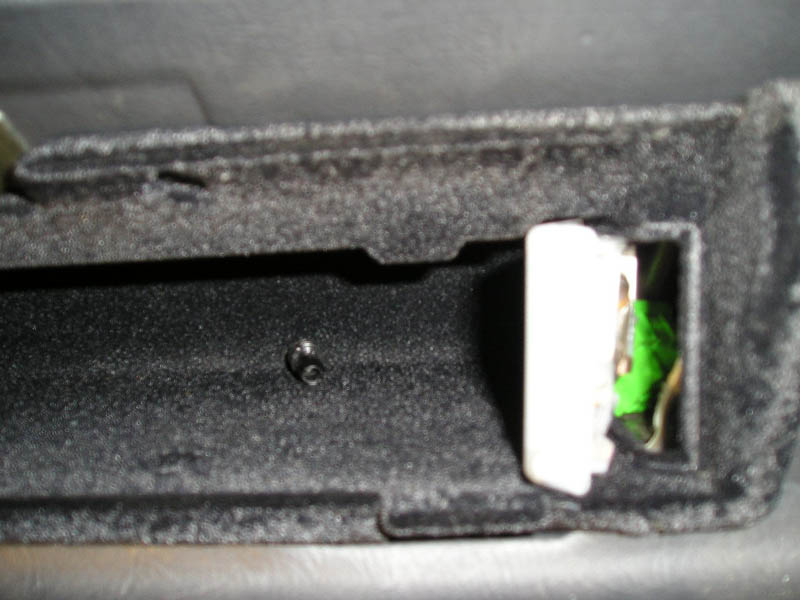
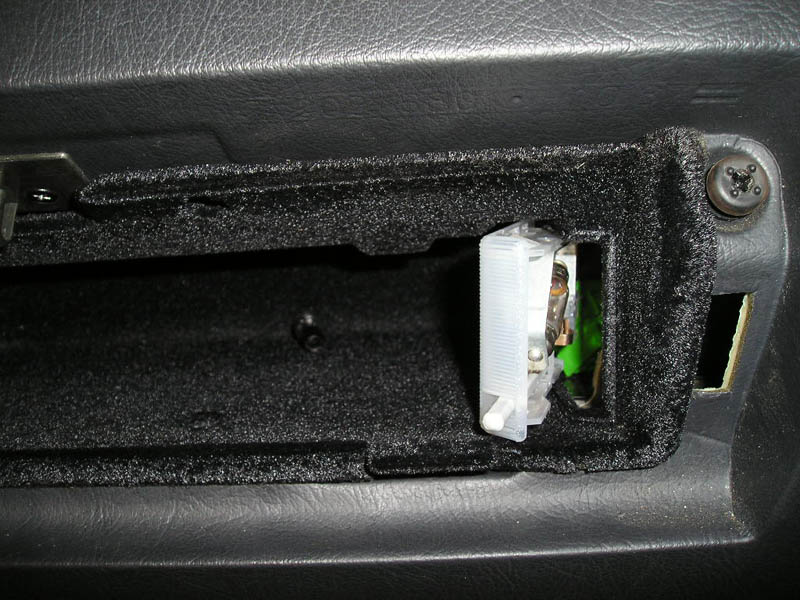
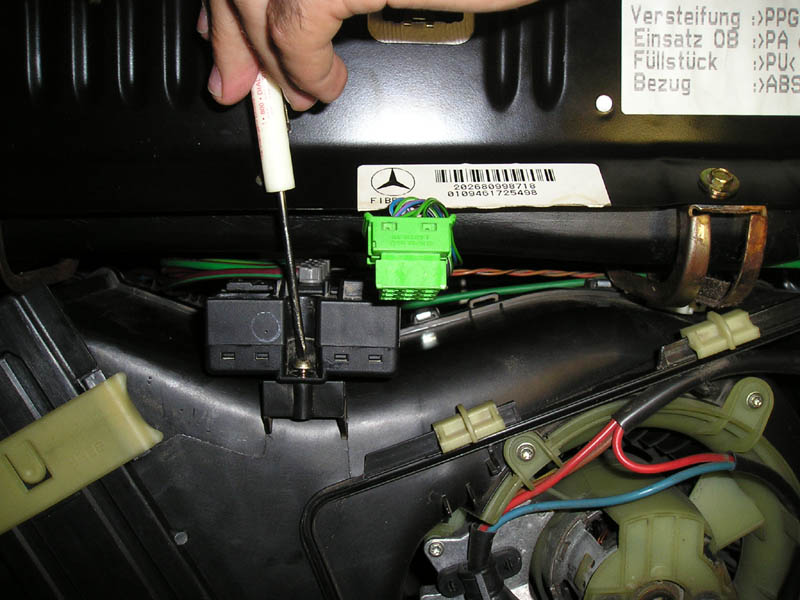
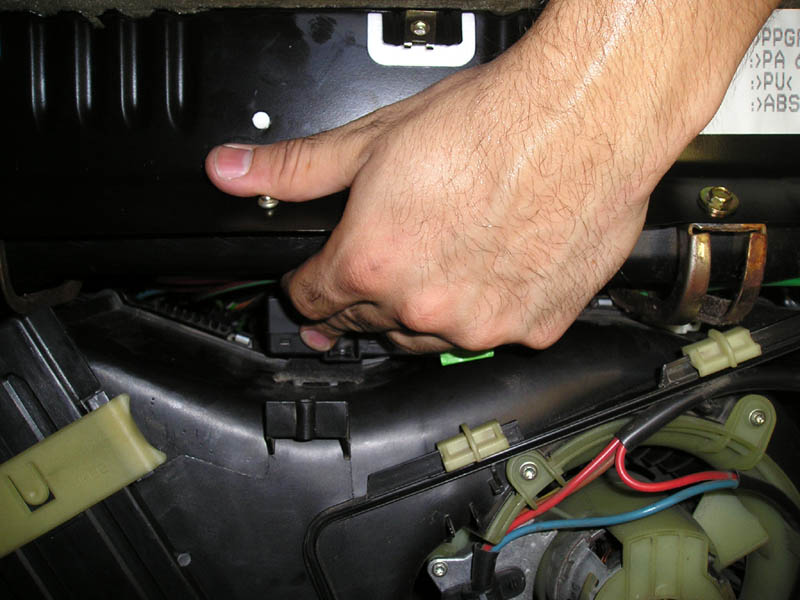
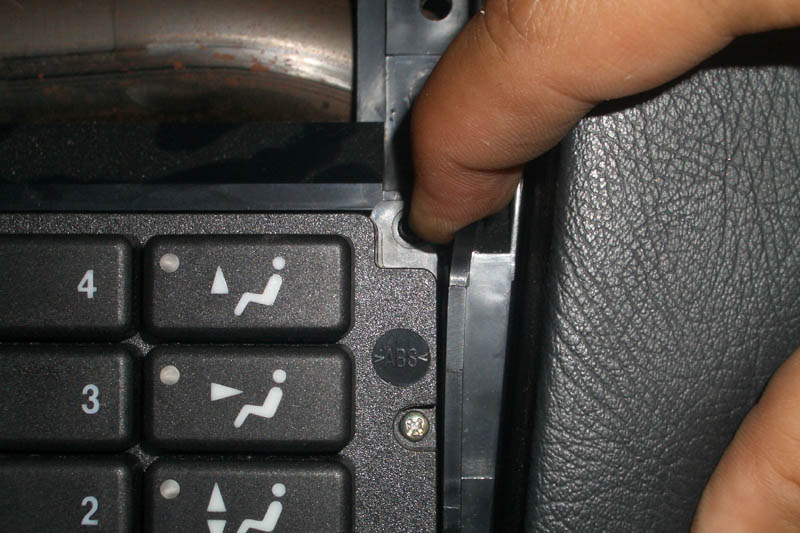
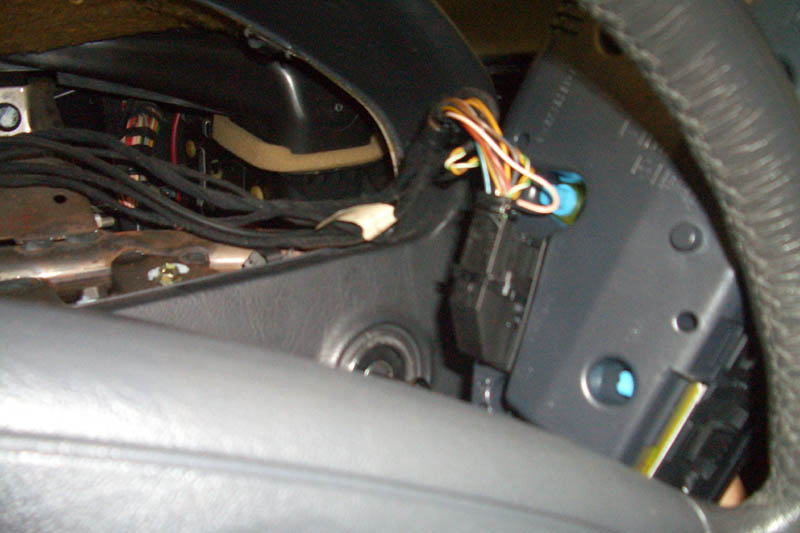
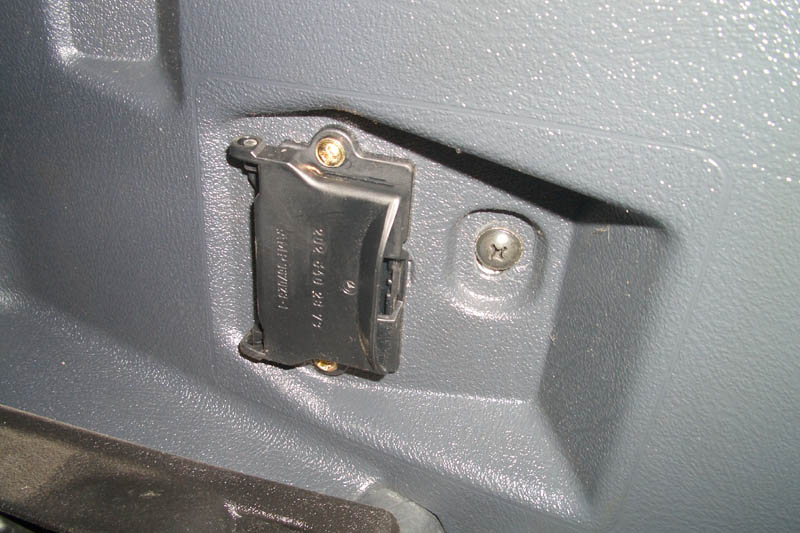
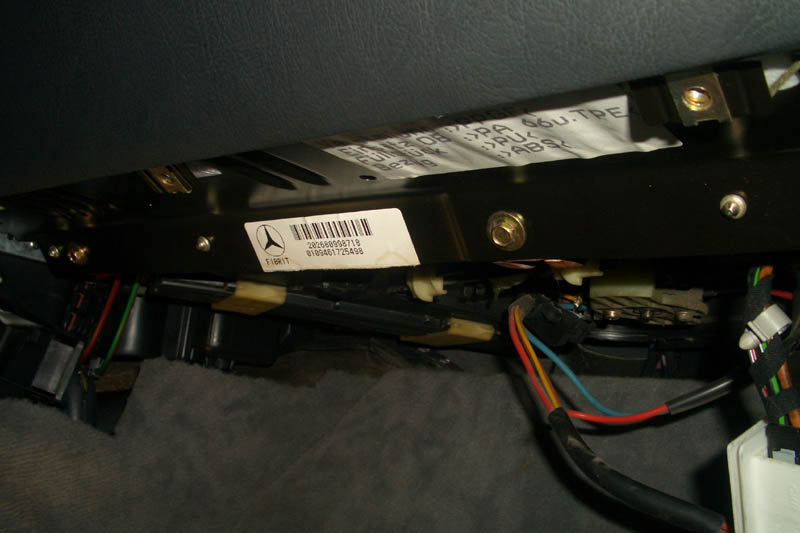
Moving of the Vacuum Control Unit for the vent system in the cabin in order to be removed:
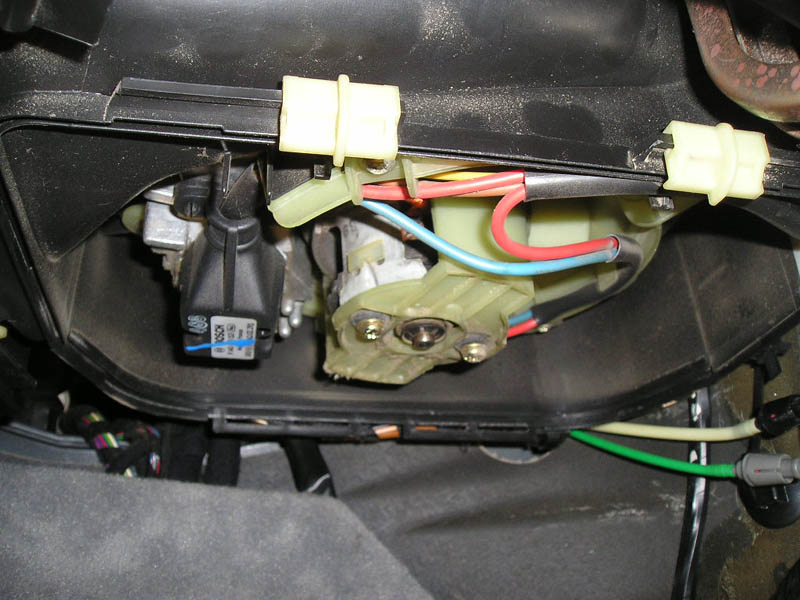
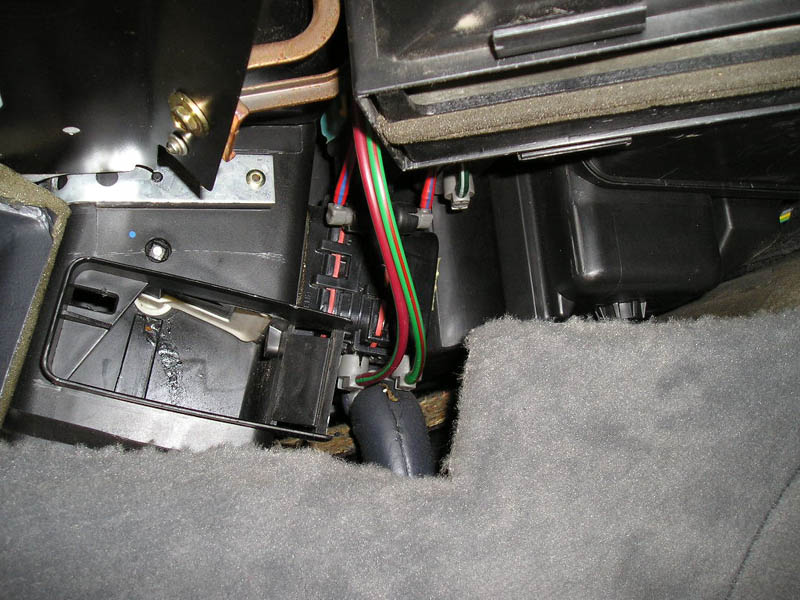
I
removed the single screw that held the unit in place. The golden screw was
actually a torx screw (#20?), but a right sized flathead works fine. After
removing the screw, the unit was sort of hanging there. I decided it would be
best to push it up to the open glove box and look at it there. To do this,
disconnect the green connector, then, get up and go back to the glove box and
remove the black ‘quick fasten’ tie attached to the metal bar. I removed this
tie to move the wires about some more, and give me more room for play. I then
laid back down, went back to the control unit and was able to push it carefully
up through the bottom of the footwell up to the glove box, then from the glove
box, carefully maneuver it to the front of the glove box. Most likely, you will
not be able to pull it all the way out because 1. the green line on the end of
the control unit prevents you, and 2. the vacuum lines are neatly arranged
against the wall of the cabin behind the newly positioned control unit. So
pluck the vacuum lines off the wall, then go back down to the floor and look at
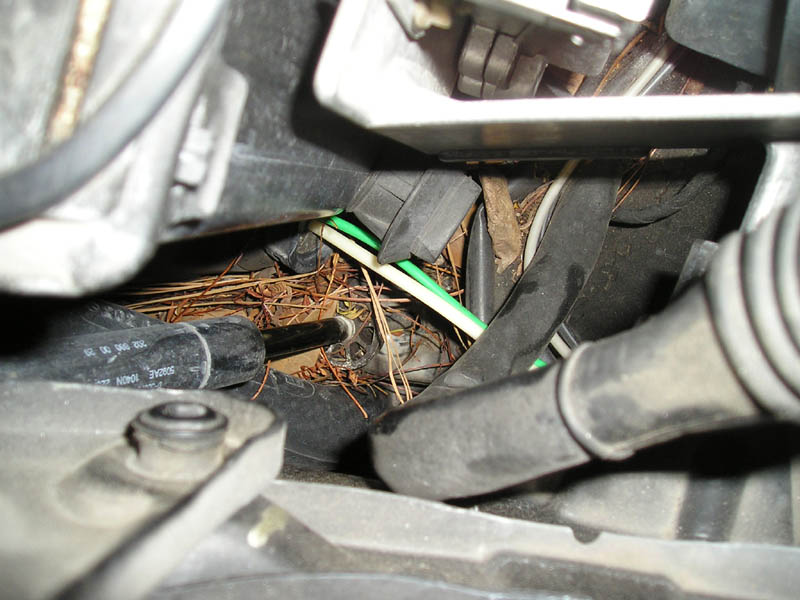
where we removed the cover by the passenger’s right foot. There you will see
the green vacuum line that connects the vacuum control unit (now located in the
glove box) of the cabin, to the vacuum distributor block in the engine bay.
This green vacuum line will also be restricted by a black ‘quick fasten’ tie, so
be very careful when you cut this, not to cut either of the tubes held down by
it. By cutting this, we have now created enough slack to slide the cabin vacuum
control unit just enough to have a good look at it.
|
|
|
|
|
|
|
|
|
|
|
|
|
|
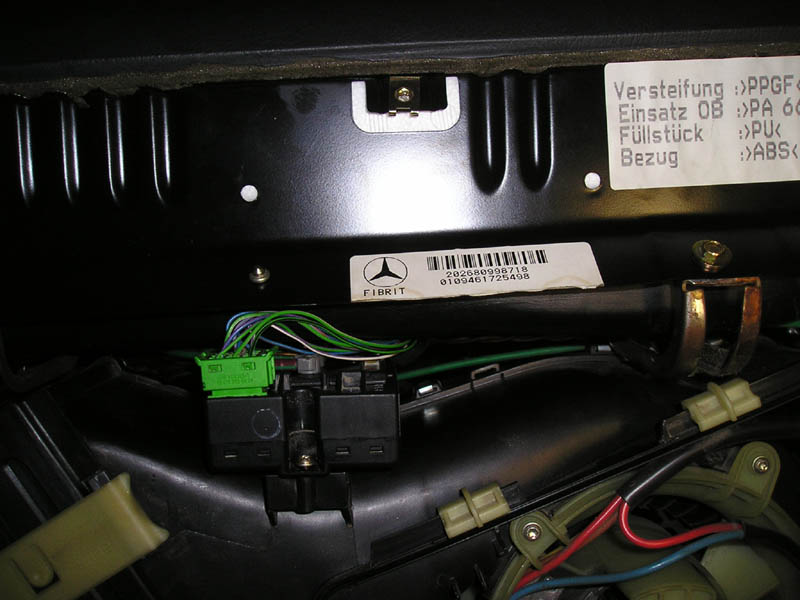
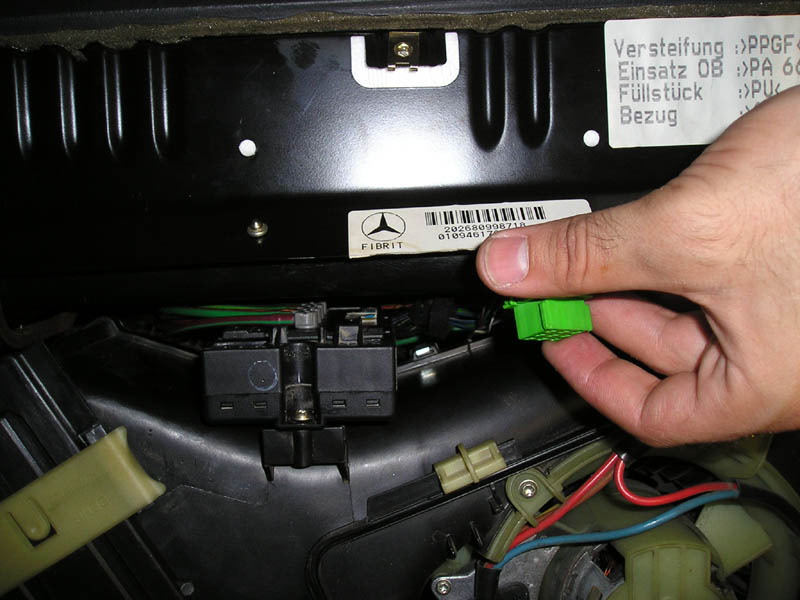
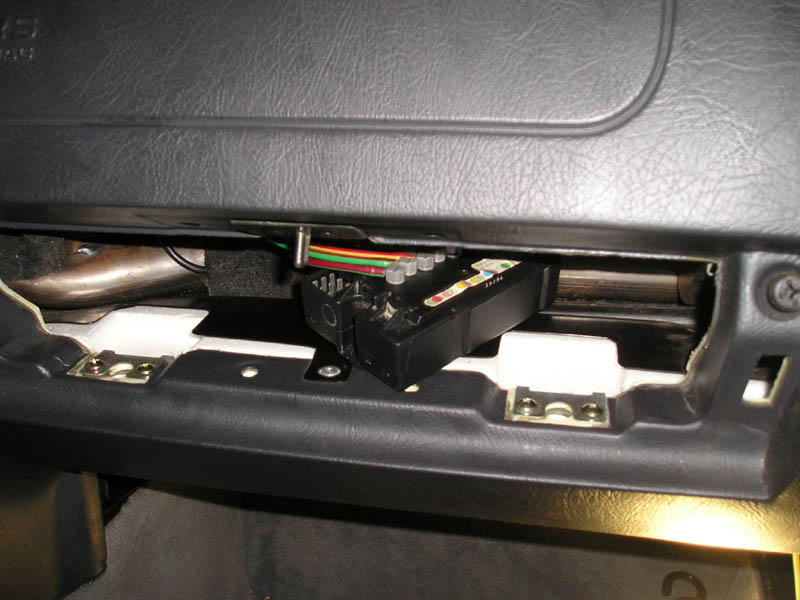
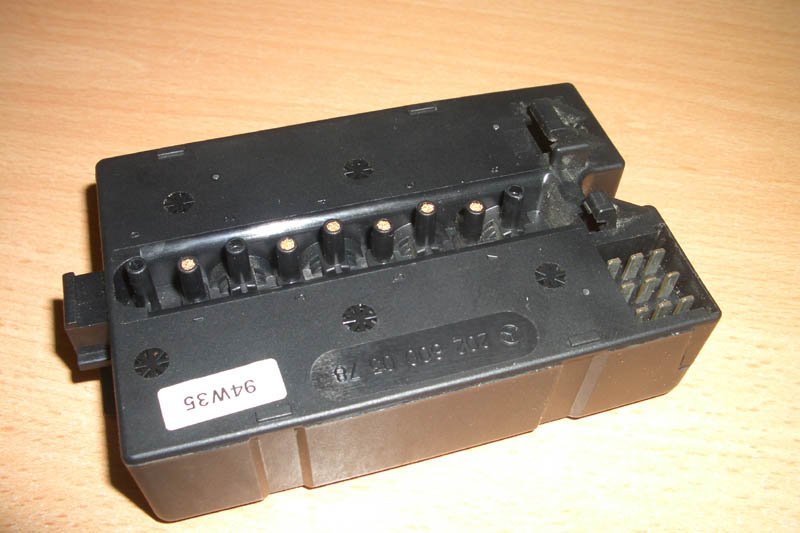
What does the vacuum control unit do?:
After repositioning the unit, I was able to determine that this was the control
unit that regulated the different vent positions. I assumed this because I
reconnected the green connector to the vacuum control unit, then turned the
ignition on and changed the vent positions on the climate control unit and felt
what seemed like solenoids clicking inside the control unit. FWICT, the green
vacuum line (0) connected at the right end of the vacuum control unit supplied
the main vacuum line. When a vent position is selected on the climate control
unit, it then supplies voltages at different points on the green connector that
the vacuum control unit takes and opens and closes certain solenoids and allows
vacuum to open and close certain vents.
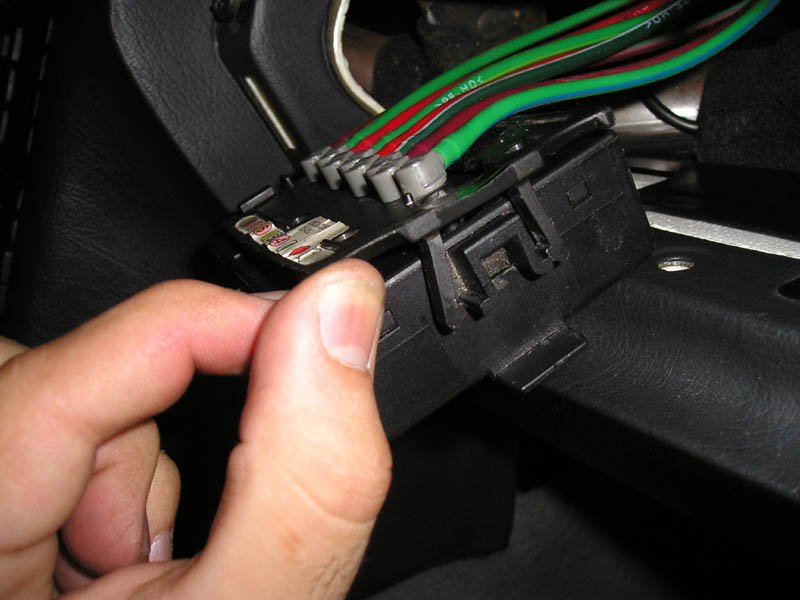
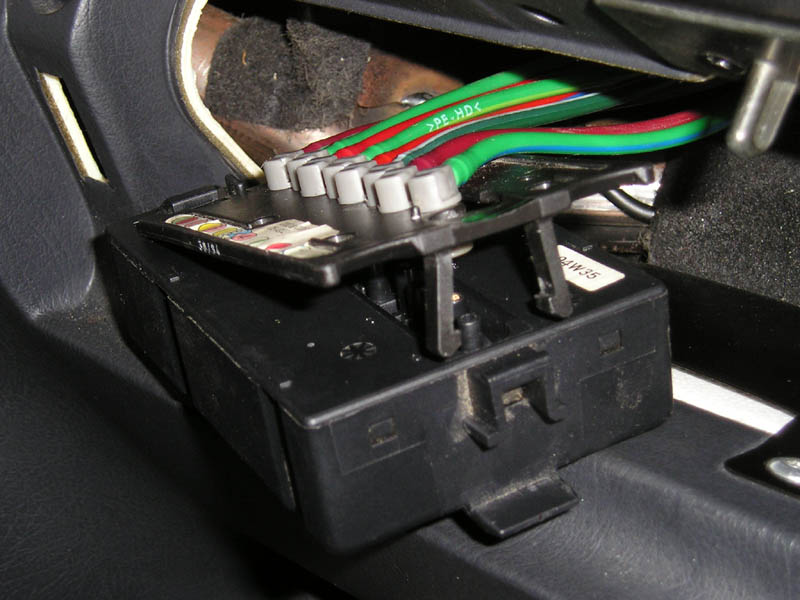
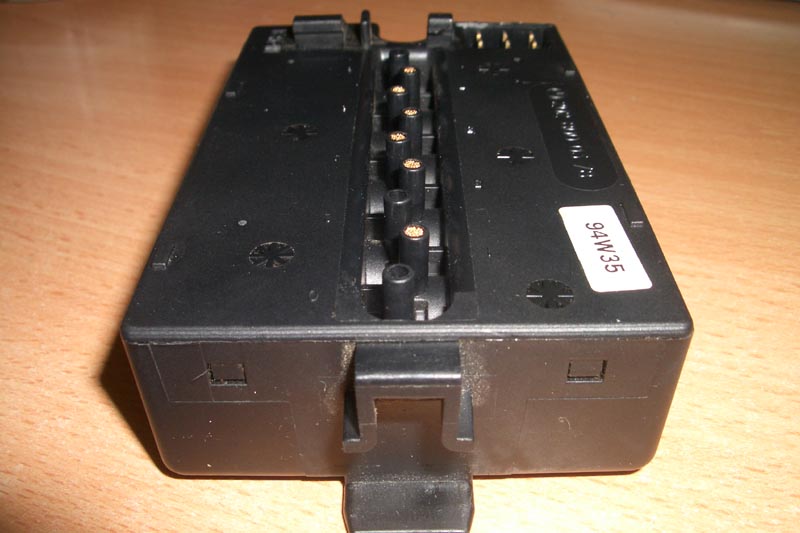
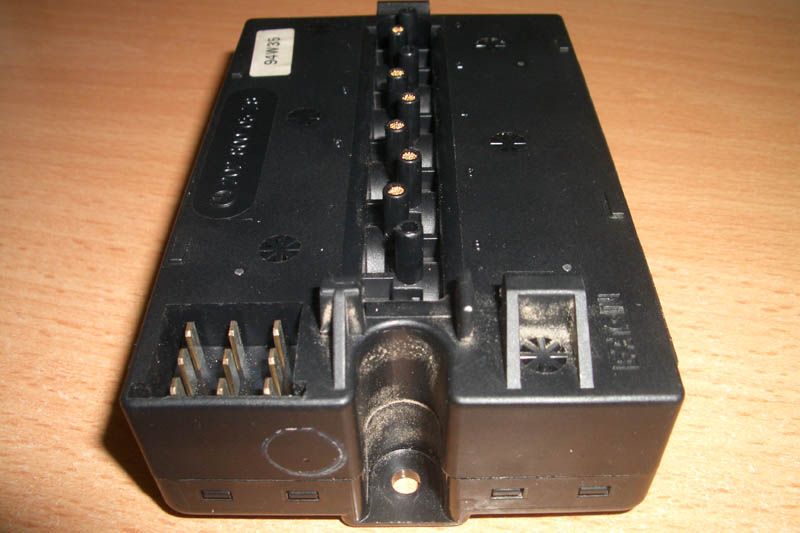
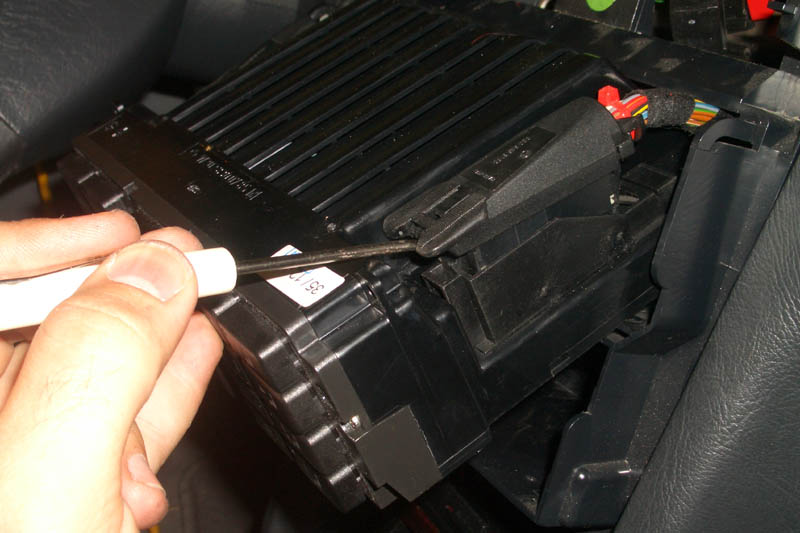
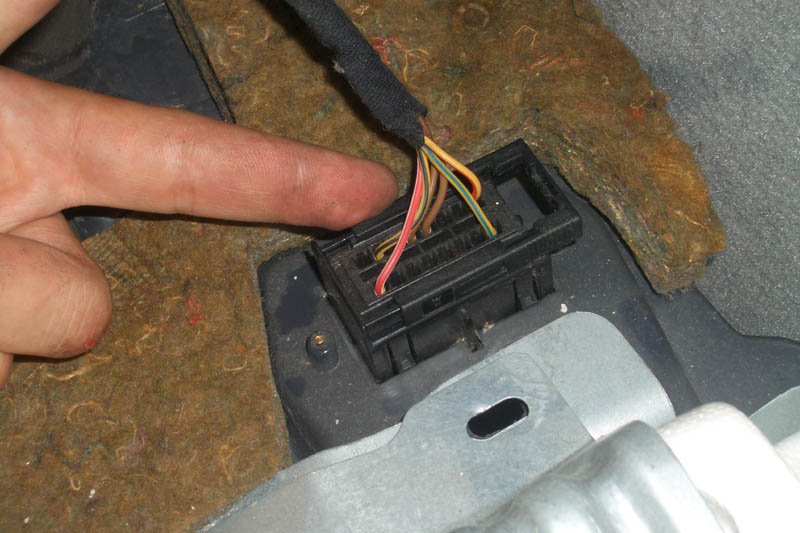
Removal of the Vacuum control unit for the vent system and vacuum lines in the cabin:
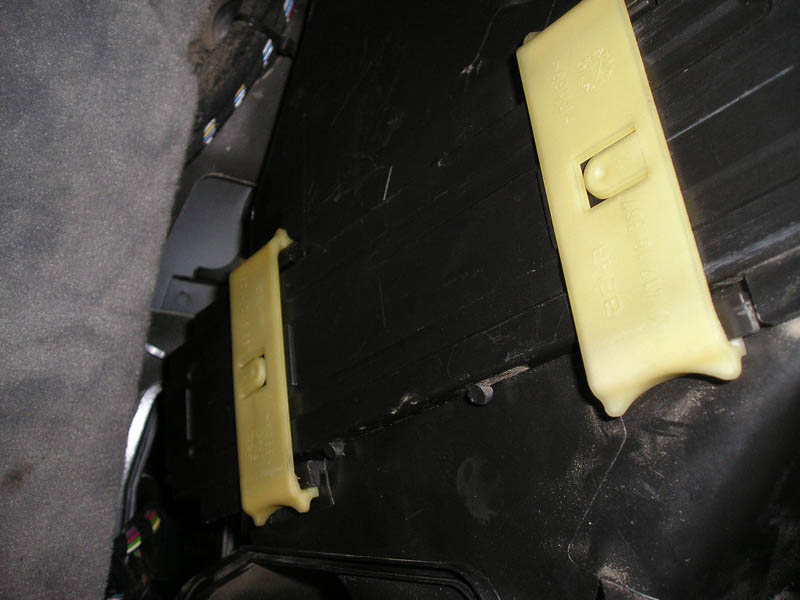
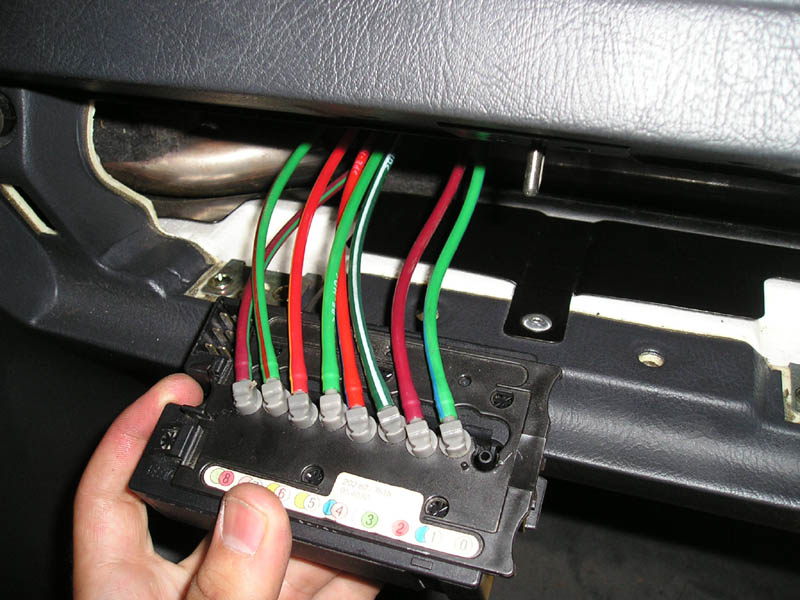
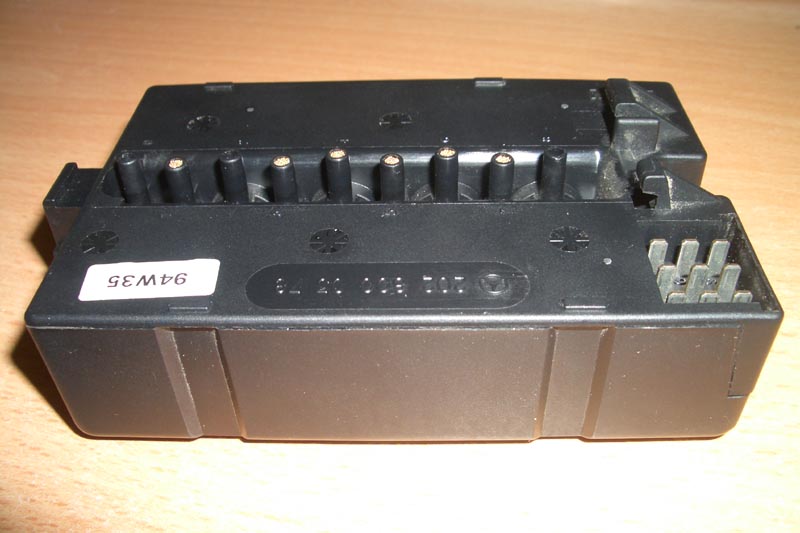
With the control unit at the edge of the glove box, you can now see that there is a large thing flat black plastic piece with color coded labels for all the vacuum lines attached that sits atop the main control unit. To remove the lines, you must remove the thin plastic piece by passing it thru clips on the right side of the control unit, and almost like peeling it off the unit. It is quite flexible, and what happens is the vacuum lines and their connectors come off with the thin flat plastic piece. If you notice in the pictures how this appears, you may get a better understanding. After you pull the top part off, you now have one piece that holds the vacuum lines in place, and the control unit that makes the necessary vacuum diversions. You can separate the lines from the small plastic piece by pushing them upwards and ‘popping’ them off. Try and understand the color coding sequence before taking them all off.
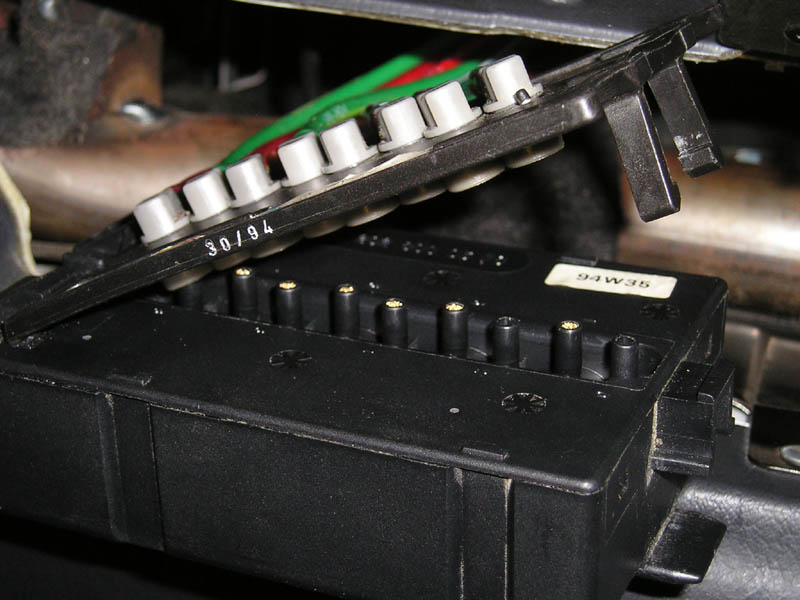
Now, at first I was unsure why it seemed there were copper-like wires sticking
out of the vacuum holes in the vacuum control unit, but after visiting the
dealership, they informed me that these pieces are meant to be there, and that
there are only two functional parts to the control unit. The rest of them are
essentially capped off with those copper-like wires. From my pictures, you can
see my control unit still has the color coding label attached going from 0 on
the right, to 8 on the left. The number 2 position (solid red) is a functional
vacuum line, and number 7 (green with red stripe) is a functional vacuum line.
The green line, 0, comes from the distribution block in the cabin and supplies
the main vacuum.
|
|
|
|
|
|
|
**This is where I stopped writing for several months so it might not be totally complete.
After removing the vacuum control unit from the glove box, I went ahead and purchased a Vacuum tester from AutoZone for about $20, and proceeded to test each individual line to see if it would hold pressure. After several tests, I found that two of my lines were not keeping a stable pressure. This is a problem; in fact, this was a major find. It just so happened my leak was coming from these two lines. I ended up tracing the lines as far as I could, but one of the vacuum bellows it was connected to was right next to the firewall, and the other was by the center vents behind the dash.
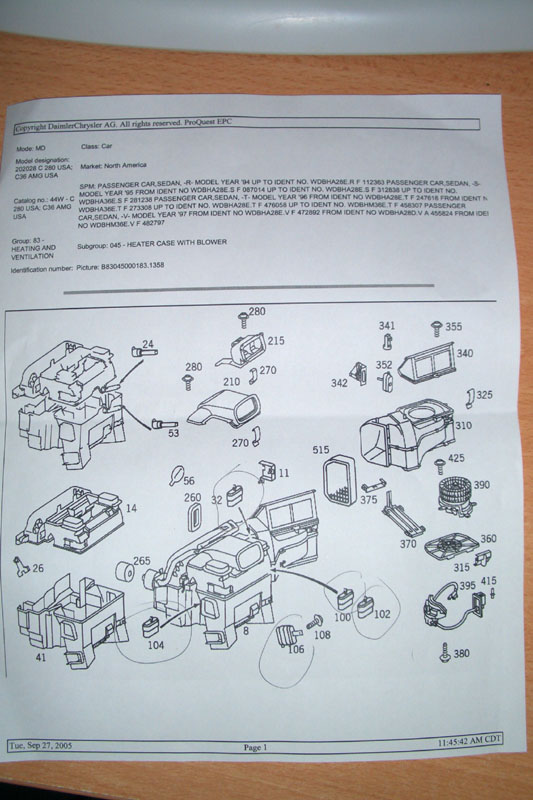
The
bellows are small plunger/accordion like plastic items that compress under
vacuum and allow for a servo-like movement/operation. These are what control
the opening and closing of all the vents. I pretty much knew this was the root
of the vent problem and that I would have to remove the dash now, so I went
ahead and purchased the correct vacuum bellows according to dealership diagrams,
under the assumption that these items needed to be replaced. (They did)
|
|
Because I’m trying to recall all this now, I think you can remove the center vents and reach in there and feel the center flap. With the vacuum tester, you can pinpoint the exact lines, and possibly move the vent back and forth and feel any sort of air coming from the line. Maybe, try opening it, and placing your thumb over the lines, then releasing it. This doesn’t really serve a purpose other than to conform it doesn’t hold pressure.
Another side note: I believe, and I’m pretty sure, there are two vacuum lines per vacuum bellow. So if one is not holding vacuum, it will cause the entire bellow to fail.
Now comes the fun part, removing the dashboard. I must reiterate, this is not for the faint of heart, and it can be very time consuming.
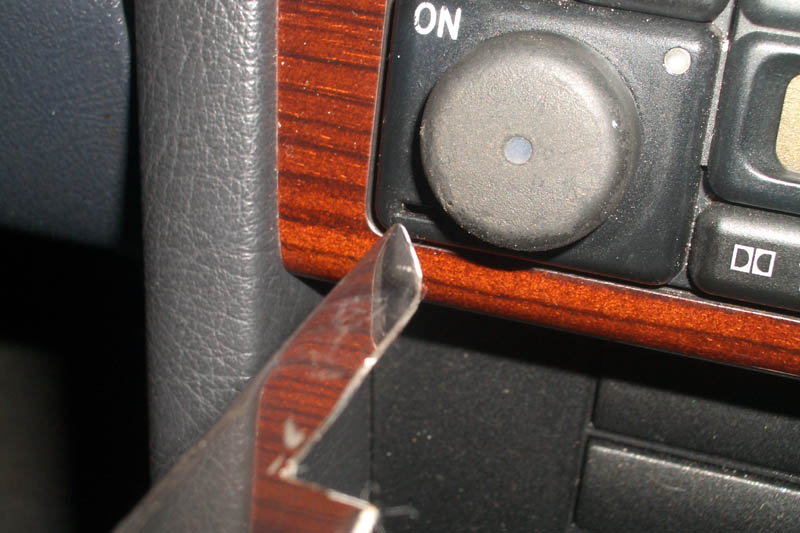
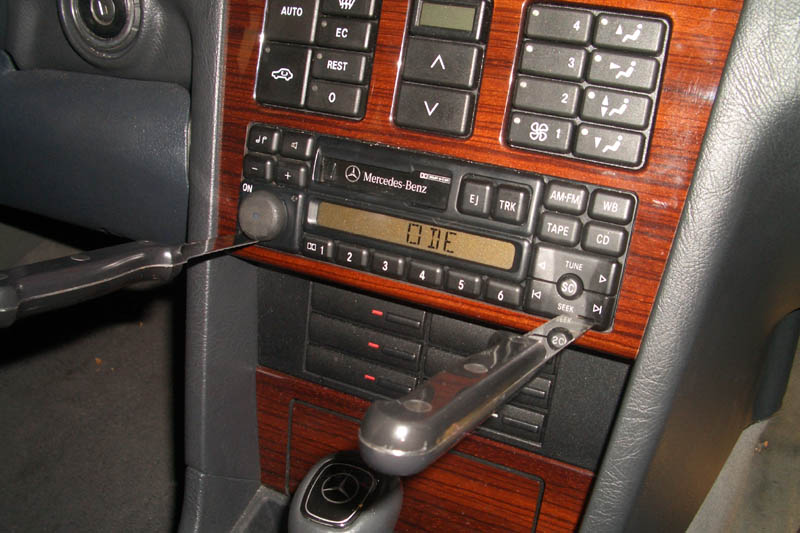
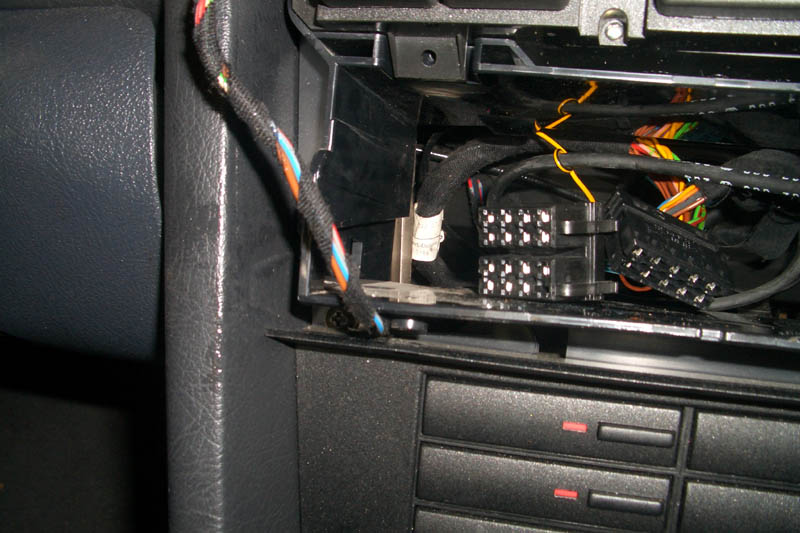
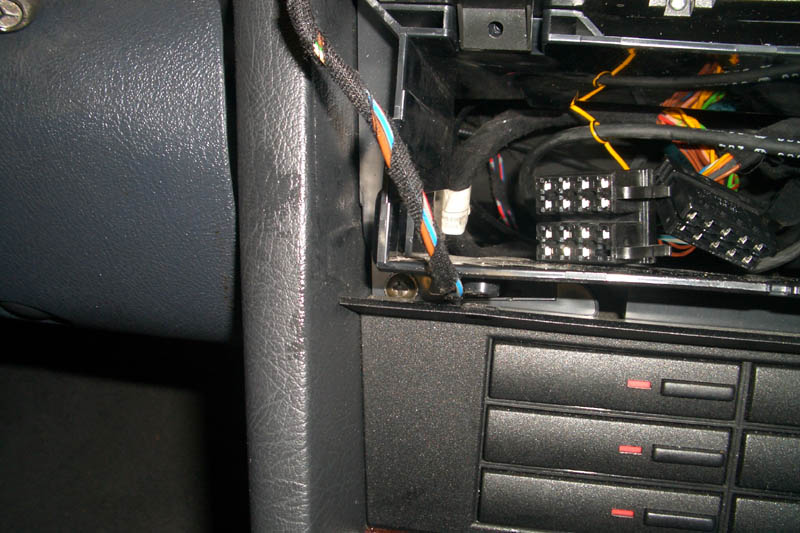
Radio:
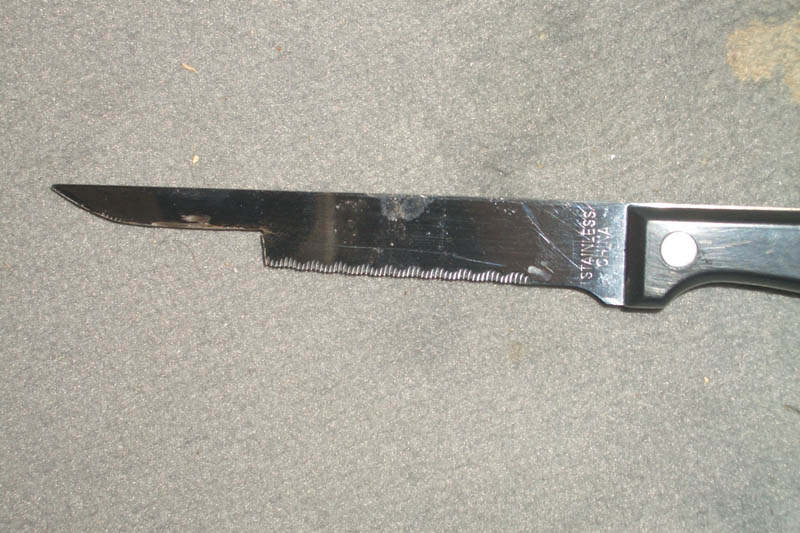
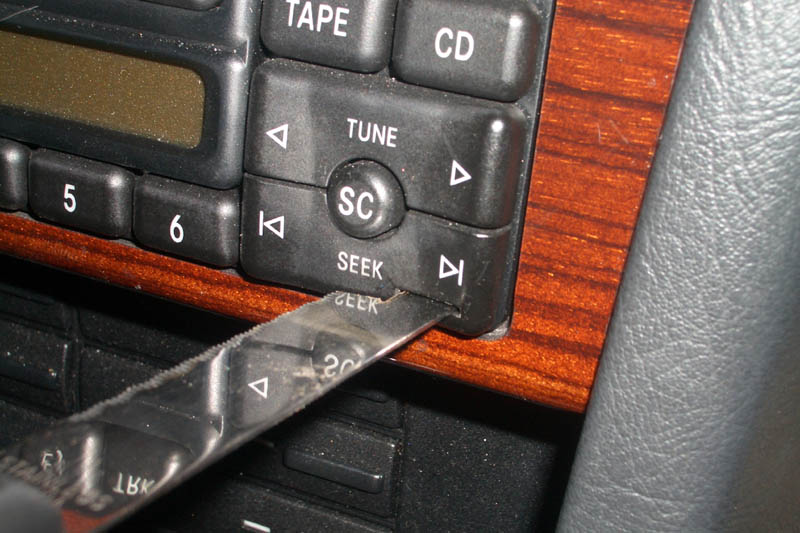
I
began by fashioning my own radio removal keys. They worked ok, but kind of
damaged my Seek key, so if you have the opportunity and the patience, pick a
pair up from the dealer, otherwise, continue on. I used two identical
inexpensive knives and a Dremel to make the appropriate key width and length.
They went right in after some readjustments and the radio came right out. I
believe there were only two plugs, and the antenna cable that were attached to
the back. Be sure you have your Mercedes-Benz radio code otherwise it’ll be
another trip to the dealer with proof of ownership (insurance) to get it again.
I was fortunate to find mine stored in my owner’s manual.
|
|
|
|
|
|
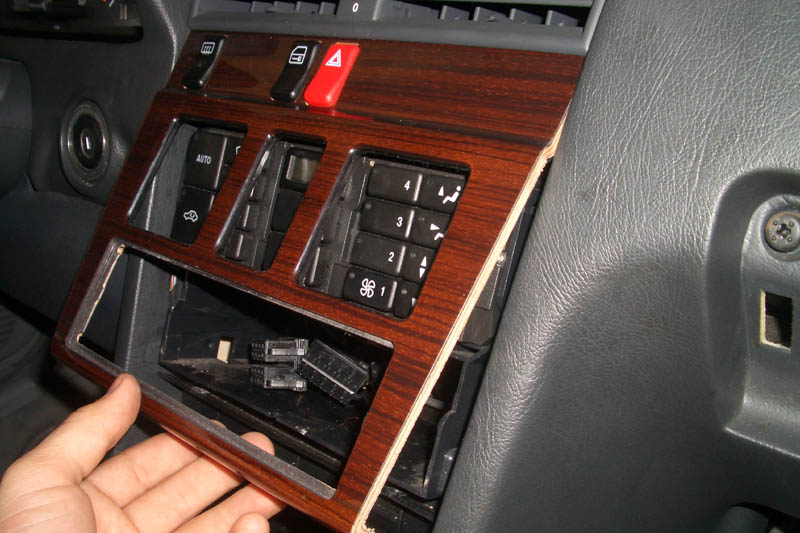
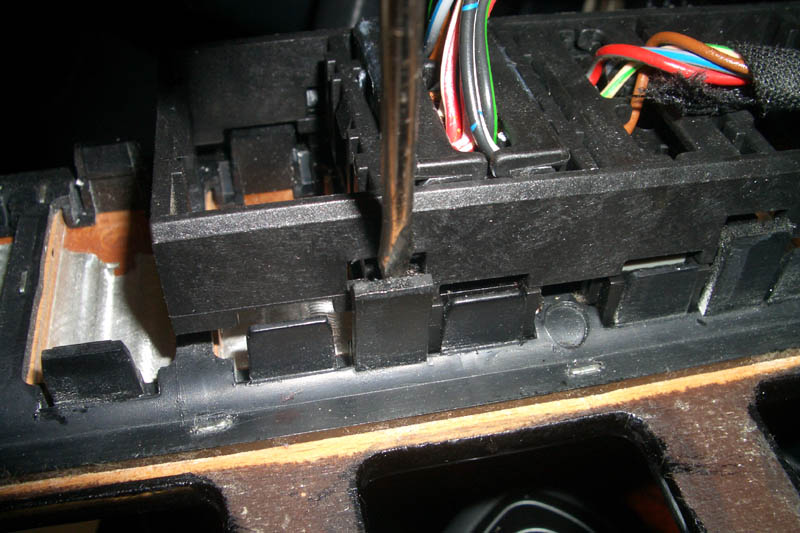
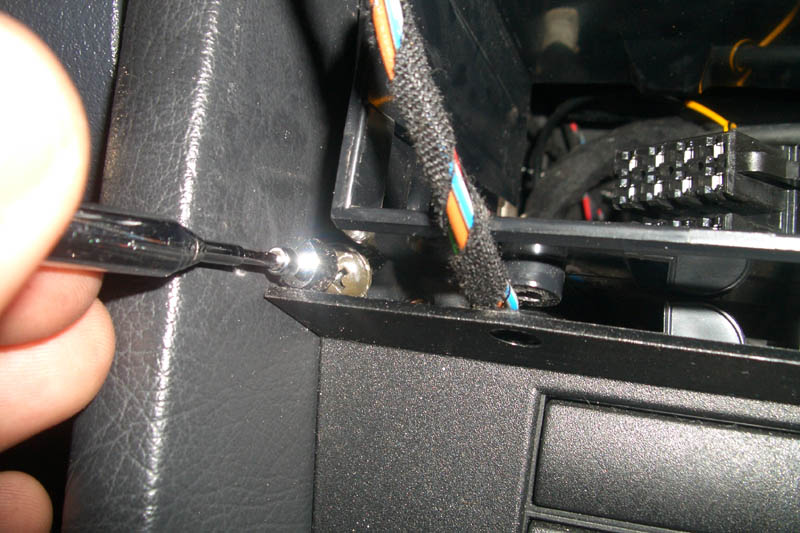
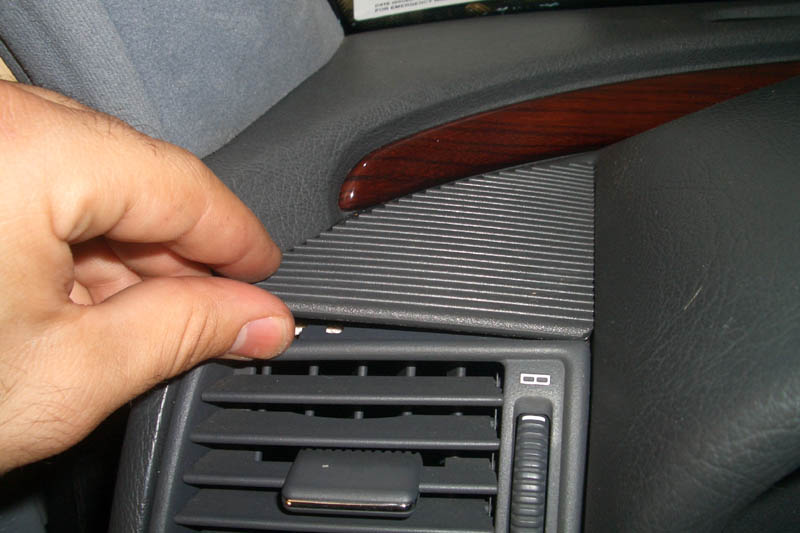
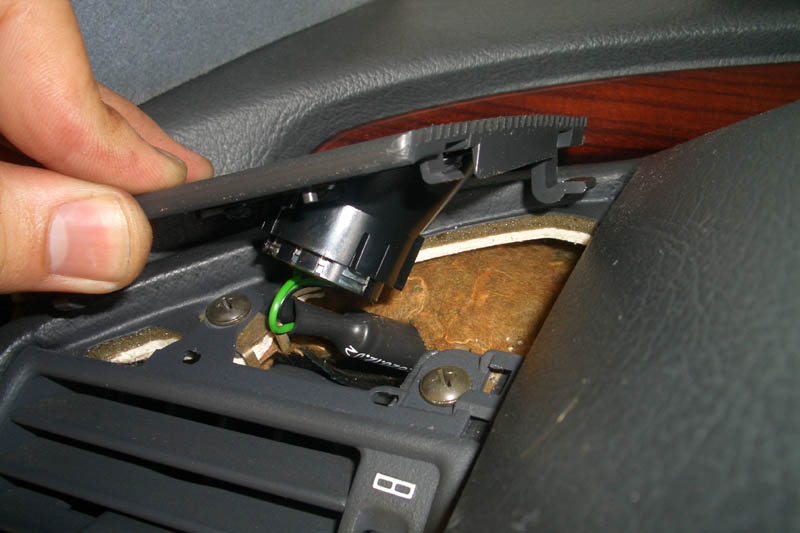
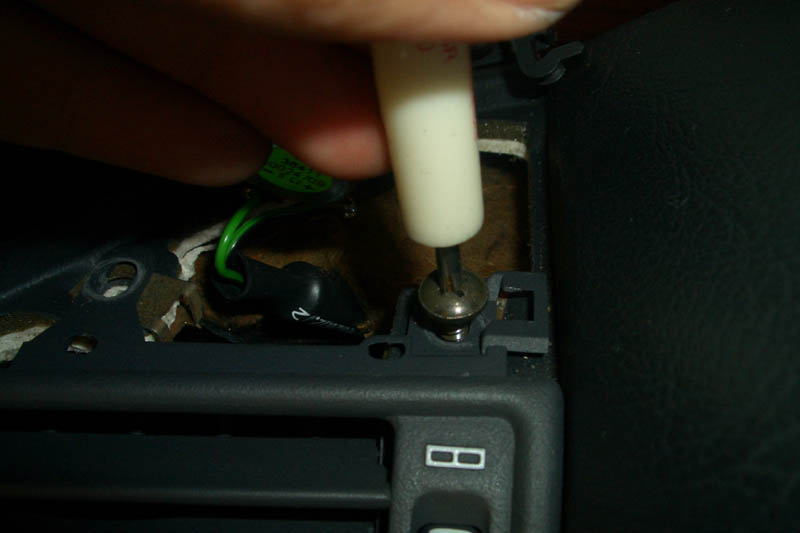
Wood Trim:
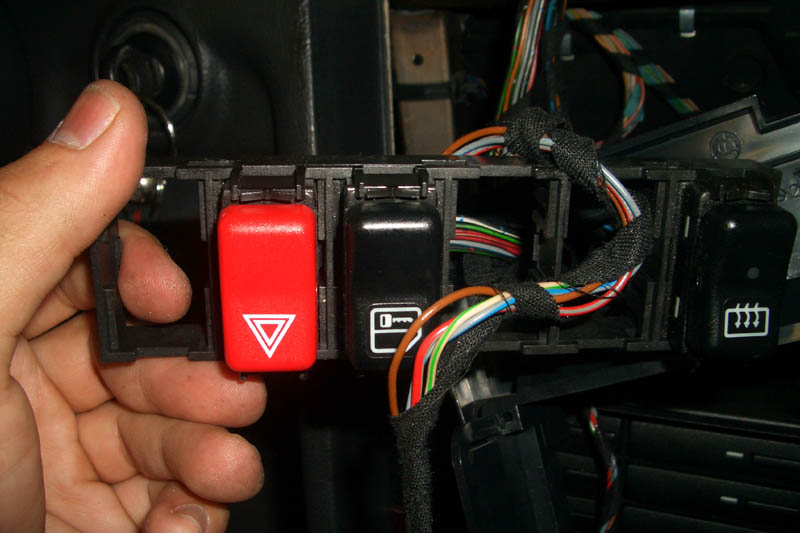
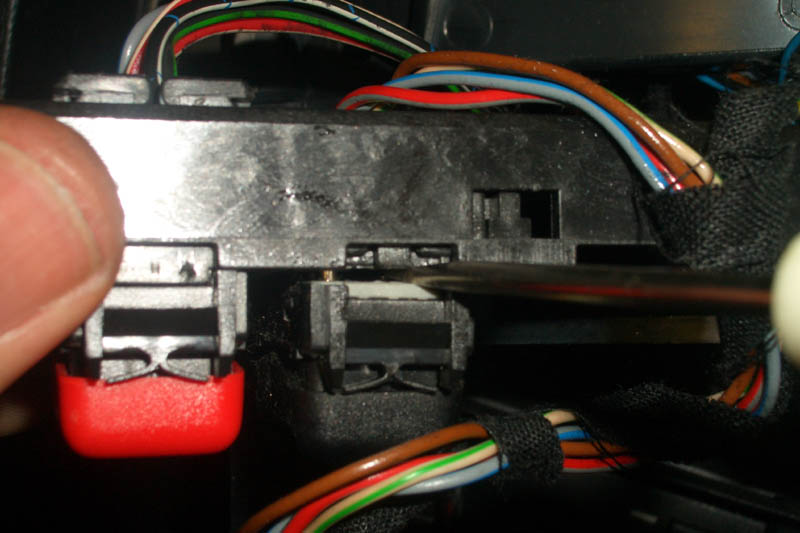
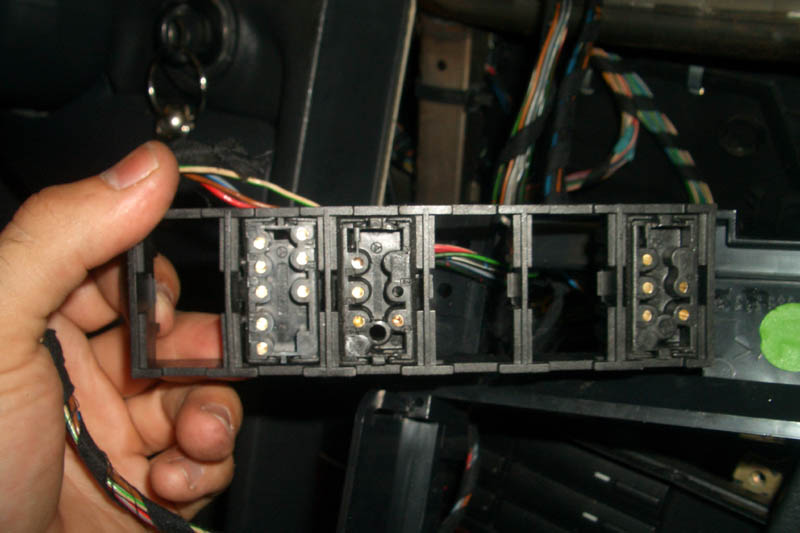
After that, I carefully removed the wood dash trim by unscrewing the two screws just below the radio, somewhat hidden from normal view. After those were safely stored away, I **carefully** slid it out and off the dash. There were a large number of plugs on the back, and the easiest way I could get them off was to follow a screwdriver along the main piece holding all the switches onto the wood, and pop it off.
From this point on, I would recommend storing everything in a safe place, and
being as organized as possible. If you are going to lose screws and bolts, it’s
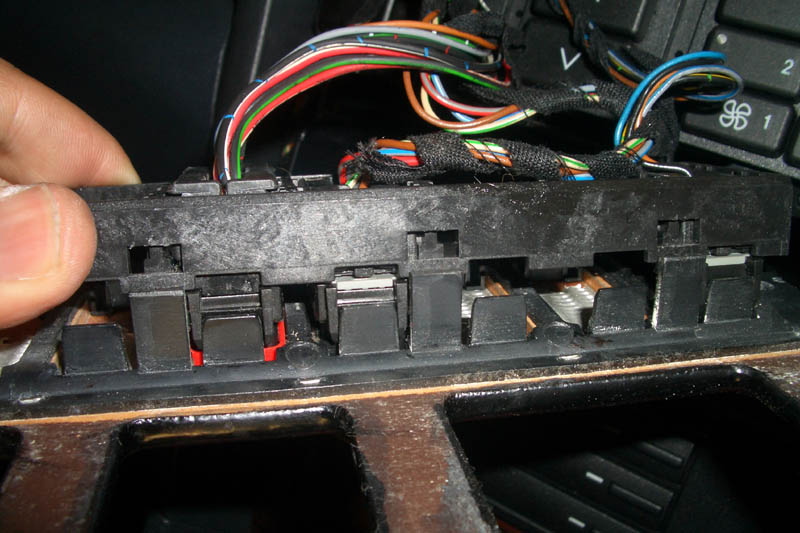
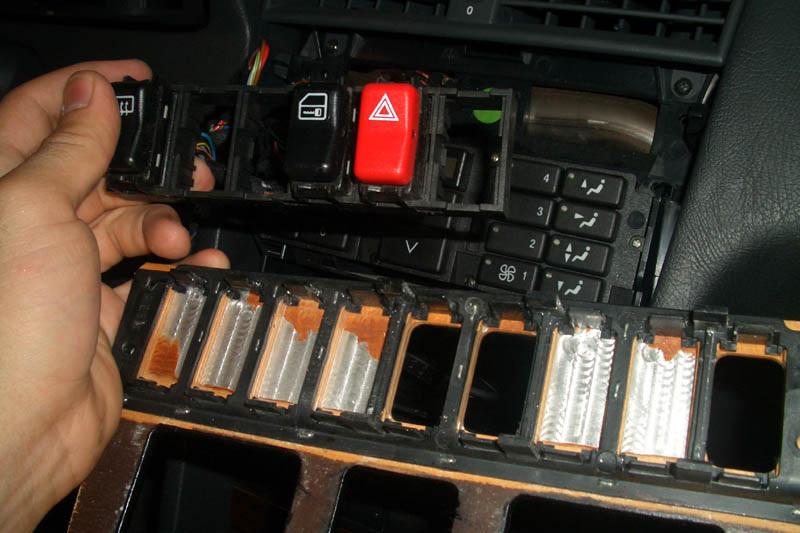
gonna be a real pain putting everything back together. I believe I also removed
the switches from that panel to replace my hazard switch by first removing all
the plugs from the rear. I then used a screwdriver to push the switch forward,
out of the plastic sub-frame. I apologize if I’m making up words as I go
along. :P
|
|
|
|
|
|
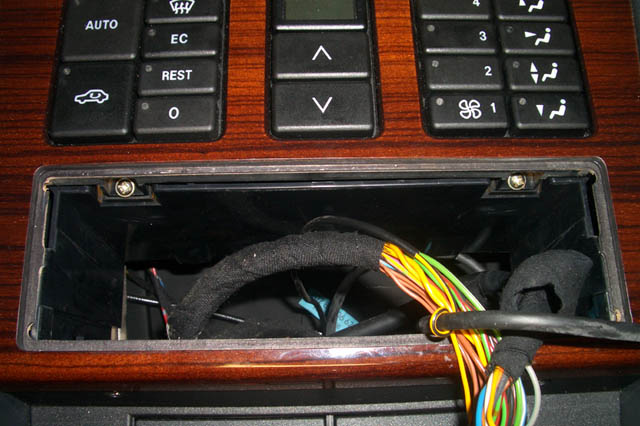
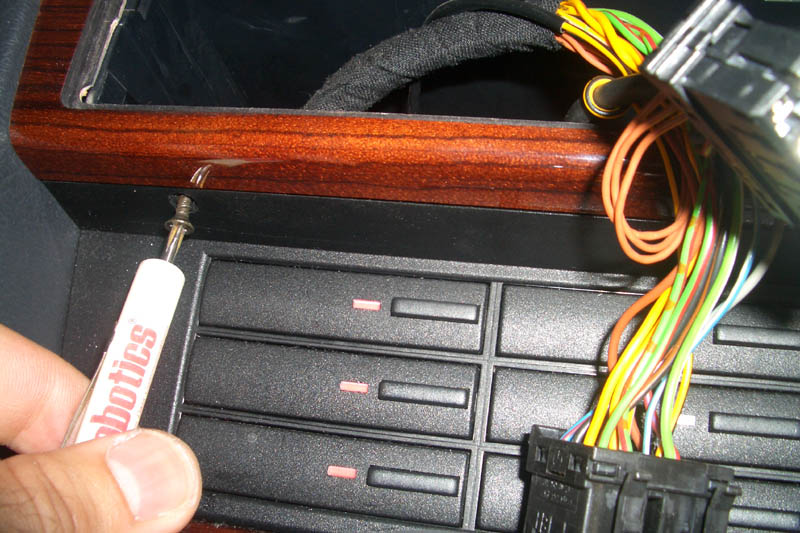
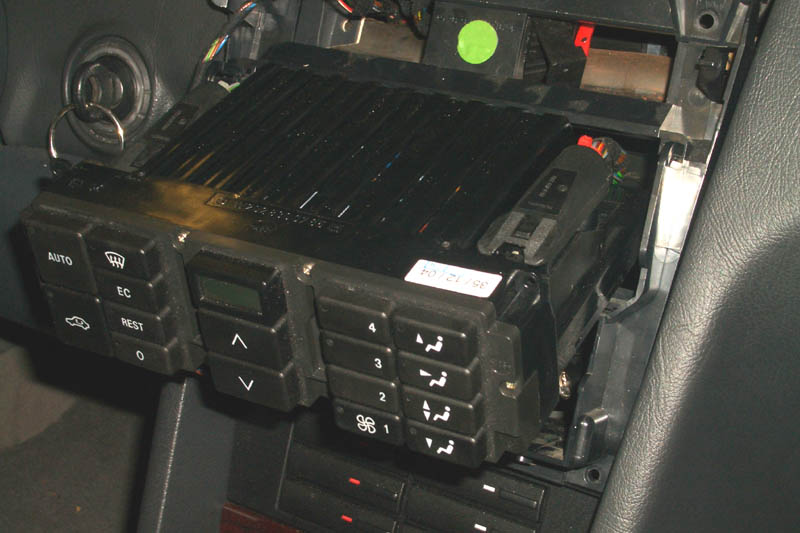
Climate Control Unit:
Removing this is easy; there are two screws on the top left and top right of the
unit that holds it in place. After the screws are removed, there are two small
clips that prevent the unit from popping out. Just push those aside with your
finger and it should slide right out. Two main plugs are fitted to the back of
the unit and can be easily removed by placing a flathead on the edge and using
it to pop it off from the release clip.
|
|
|
|
|
|
|
|
|
|
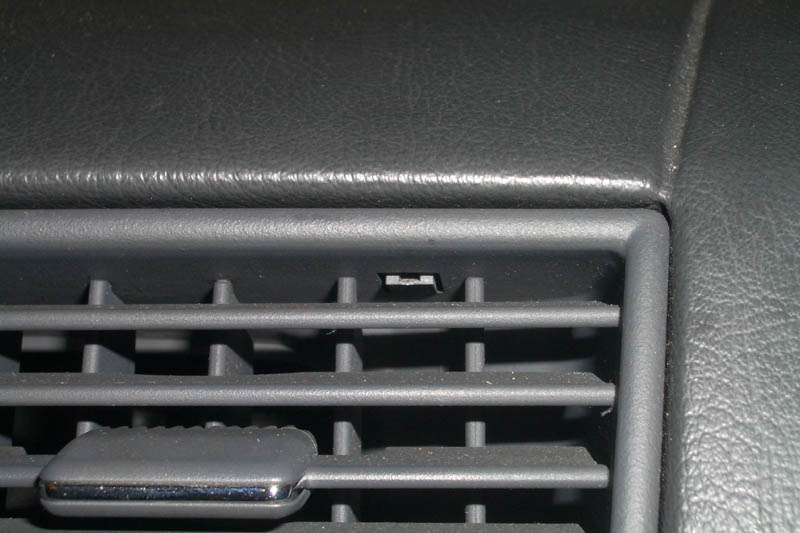
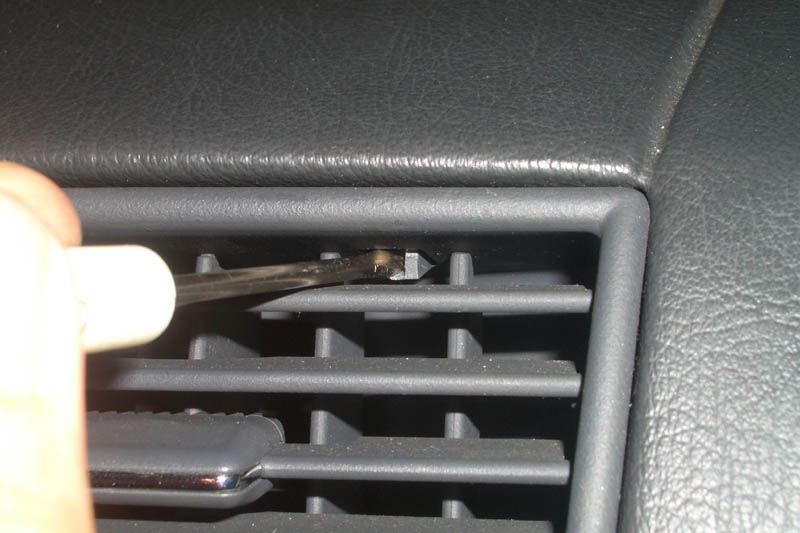
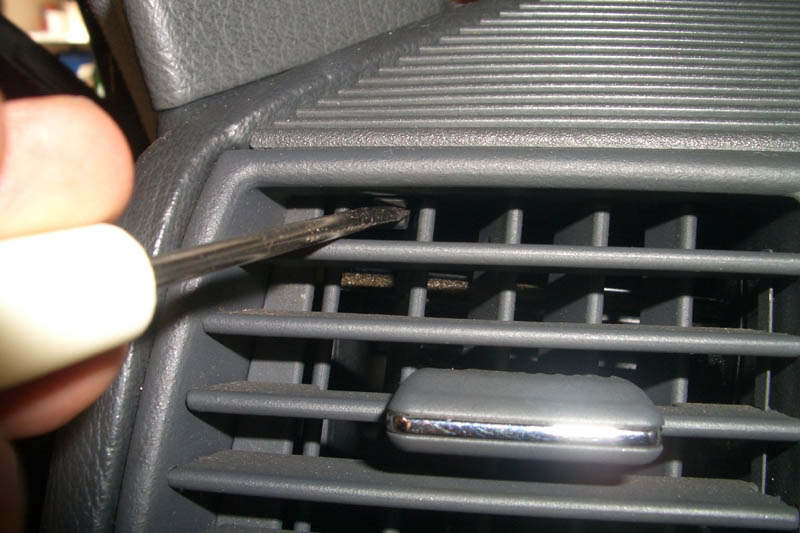
Center Vents:
To
remove the center vents, there are two small screws that hold it in place.
After these are removed, there are two small clips in the actual vents, on the
upper portion, that must be pushed down before the vent can be removed. Be
careful though because this plastic is quite fragile in a sense that the clips
dent really easily. If you look closely at the pics, you can see what I mean.
|
|
|
|
|
Cassette Holder:
Next up is the cassette holder. This item took me a while to figure out how to
remove, and I’m not sure how many people actually have them, but once you remove
these two pretty concealed screws, you should be able to shimmy it out quite
easily. For some reason though, I remember having a horrible time taking it
out, so if it takes some massaging and elbow grease, give it some time.
|
|
|
L&R Right Tweeter Covers:
This is another simple item to remove, you just have to pay special attention to
the plastic clips and be very, very, gentle. These things break very easily,
and I know because I broke a clip on mine. It’s not detrimental, but if you
take your time, it should come out perfect. Pay special attention to the
picture and the clip by my thumb and the one on the bottom and top right. If
you can hit these off softly, you should be in excellent shape. Instead of
removing the tweeter or cover, I think I just stuffed the whole thing in the
vent, lol, it’s easier, it’s out of the way, so don’t hassle removing it. Same
process follows for the right tweeter cover.
|
|
|
|
|
L&R Vent:
After the tweeter speaker cover is removed, there are two small screws that need
to be removed, and saved, and another one of these small clips position in the
actual vent itself. Using a flathead, this can be pushed down and the vent
easily removed.
|
|
|
|
|
|
|
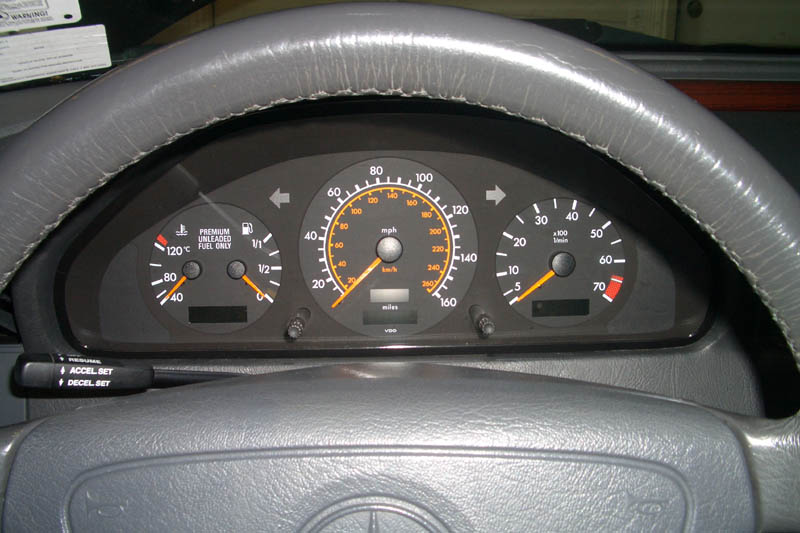
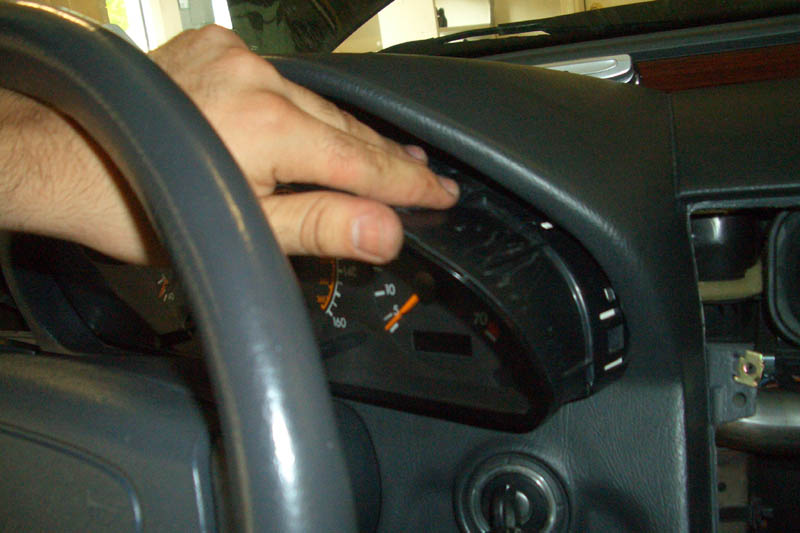
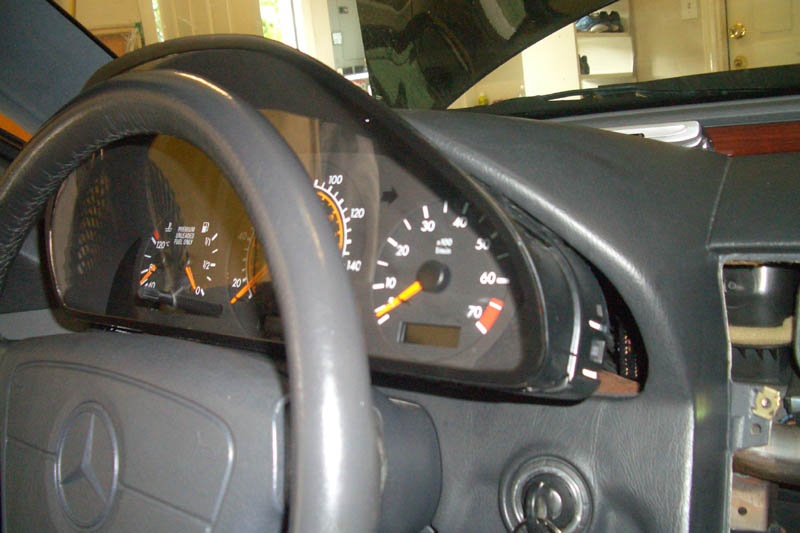
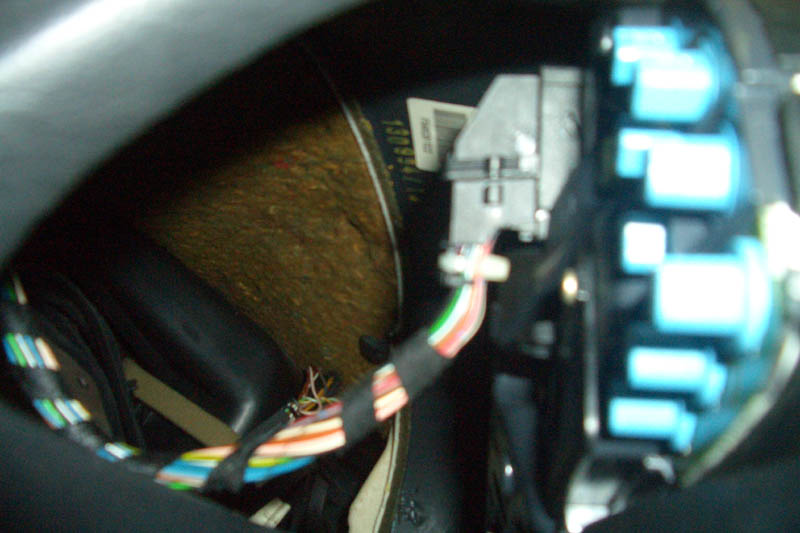
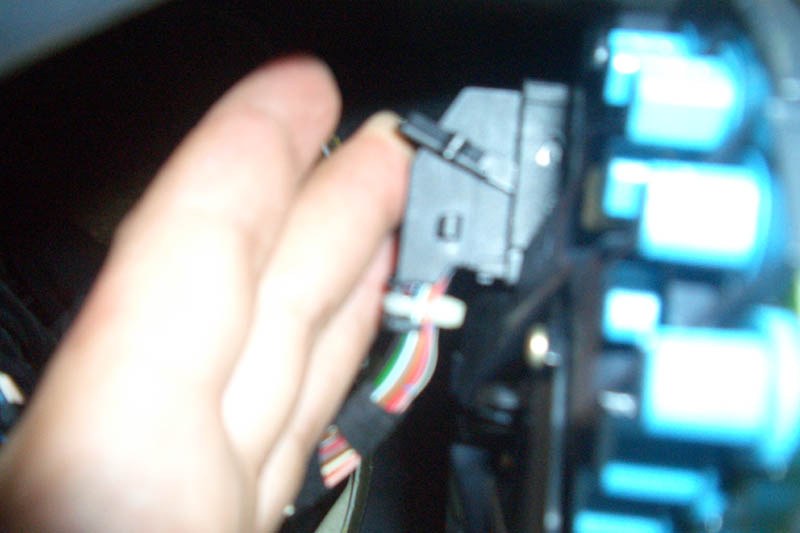
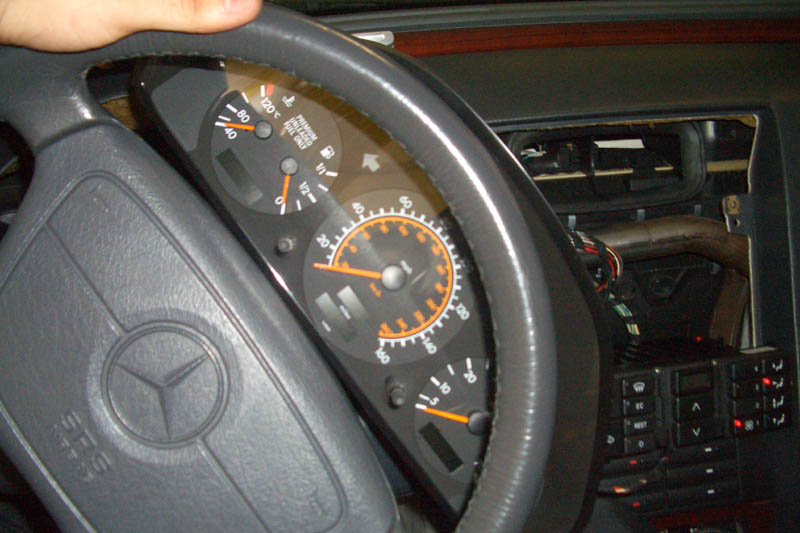
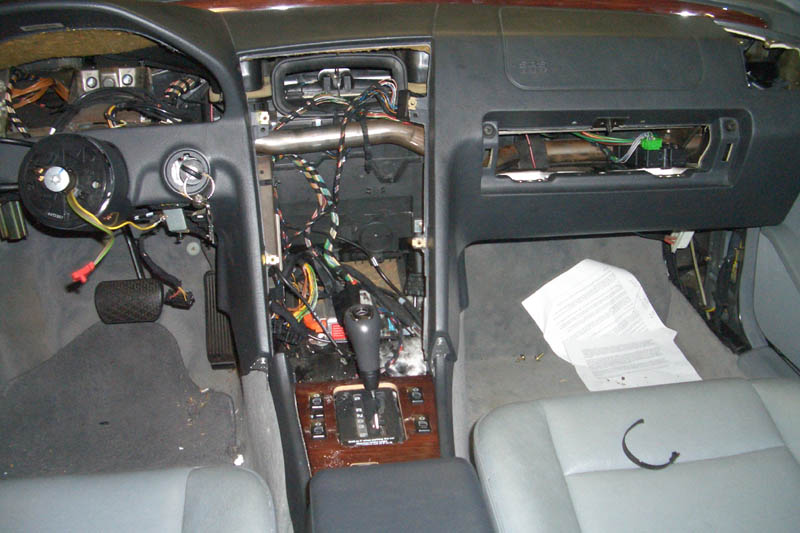
Instrument Cluster:
With a lot of the dashboard already removed now, the instrument cluster can be easily taken out by pushing it from behind. Some people would prefer to remove their steering wheel before doing this as not to scratch it. Others would advise putting a towel over the cluster, pulling the cluster out the dash, and rotating the steering wheel with the cluster positioned against the wheel to remove it.
What I did was pop it out from behind the dash, (it might take some force if its never been removed). Then unplug the left plug by pushing a small button in and sliding the locking mechanism 90 degrees. Then, rotating the steering wheel and instrument cluster 45 degrees, sliding it out from behind the steering wheel, and removing the remaining plug. I apologize, I don’t recall if there were two or three plugs total.
Now that the dash is looking
a bit empty, maybe it’s time to sit back, reflect, have a drink, and curse a
little bit.
|
|
|
|
|
|
|
|
|
|
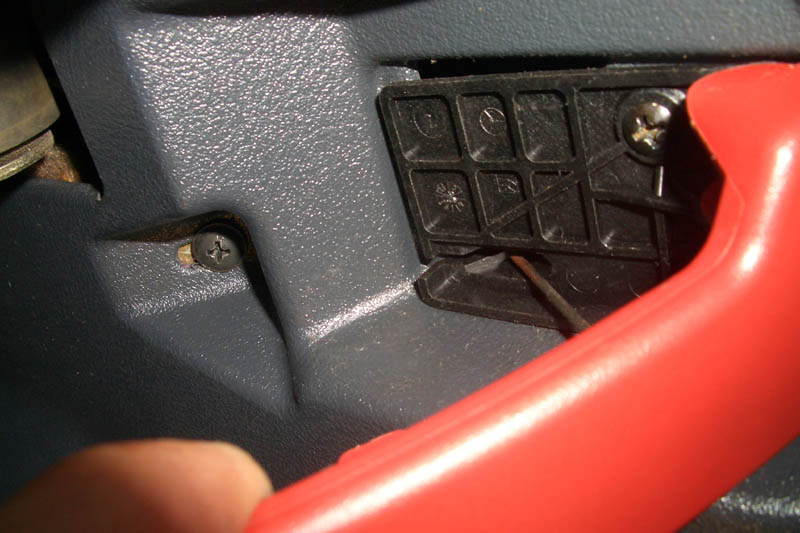
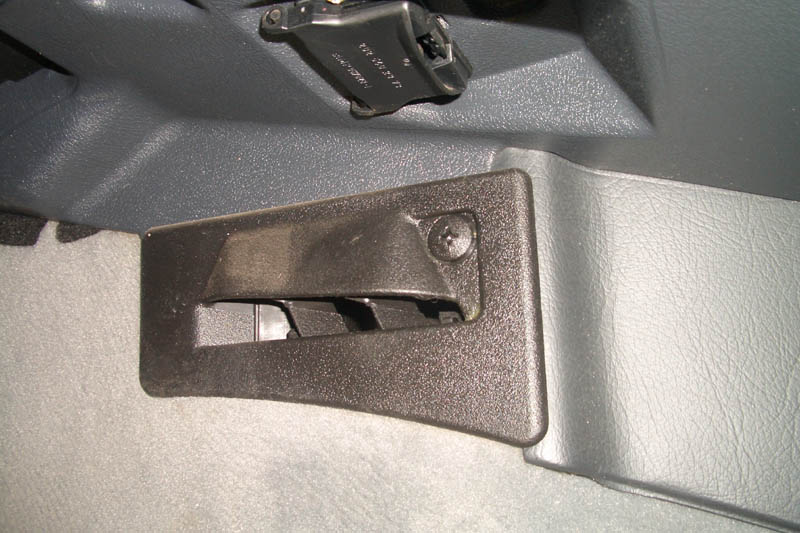
Drivers side floor panel:
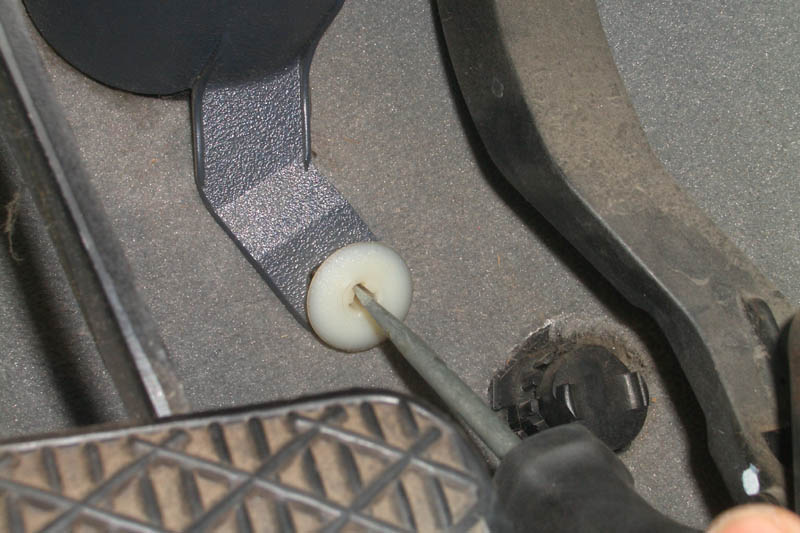
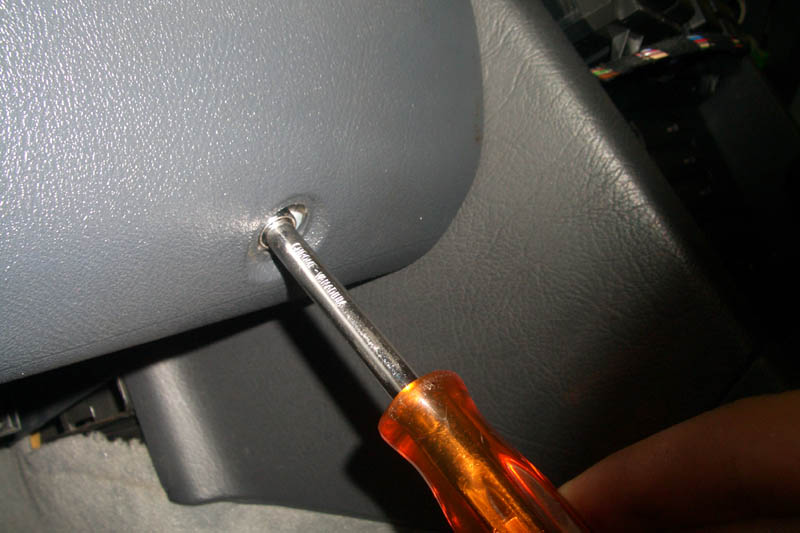
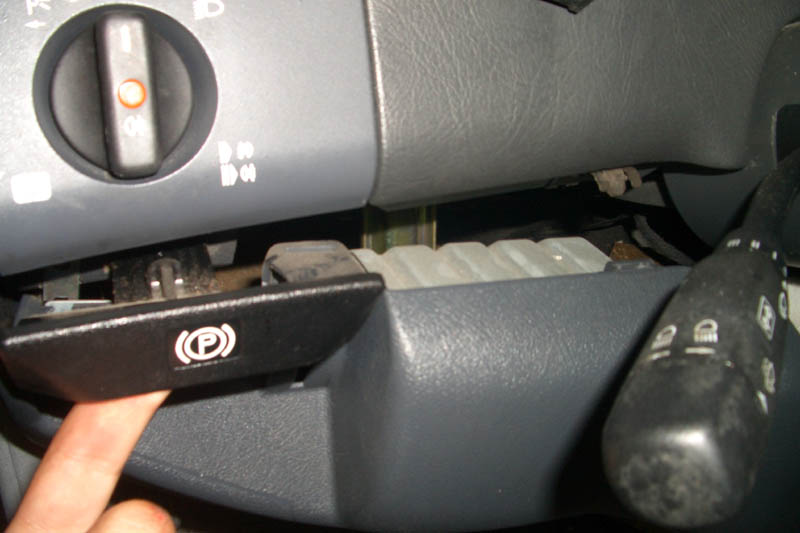
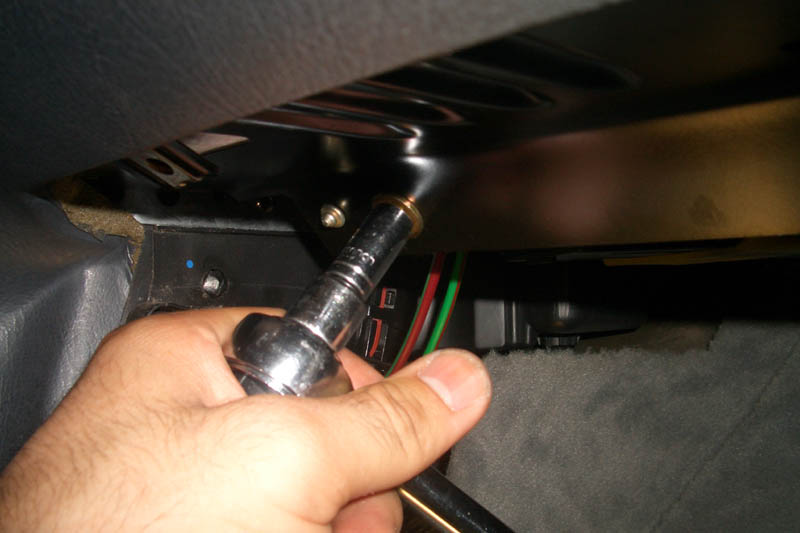
This shouldn’t take too much effort, its just a pain to get too. From what I recall, there really is no comfortable position for much of this job. I started by removing the screw beside the parking brake release lever. Then I removed the screw that holds the hood release lever to the panel, and using my hands or needle nose pliers, removed the cable that is attached to the release lever. (I don’t remember, lol.)
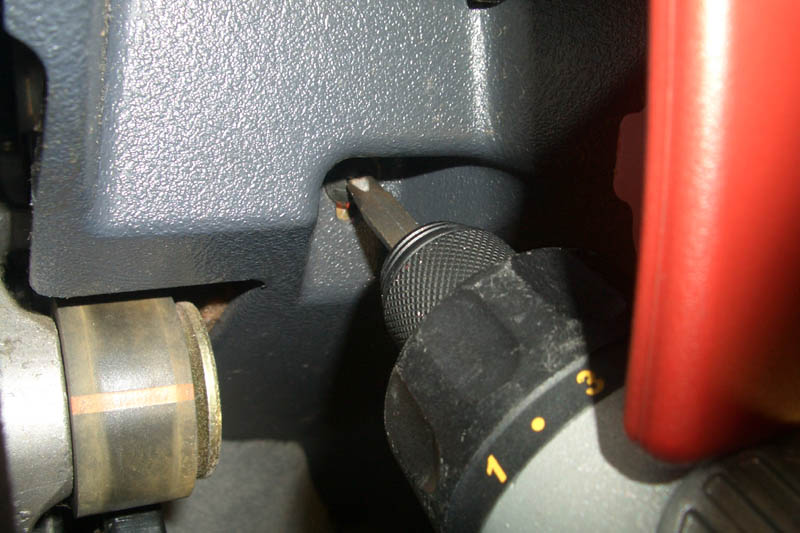
There’s another small screw located right behind the lever which also holds the panel up, so remove that too. Another screw by the computer diagnostic port needs to be removed, along with a giant white plastic screw that is right between the foot pedals. The foot vent also covers part of this panel and must be removed by unscrewing, or popping, or a bit of both, to remove that plastic screw.
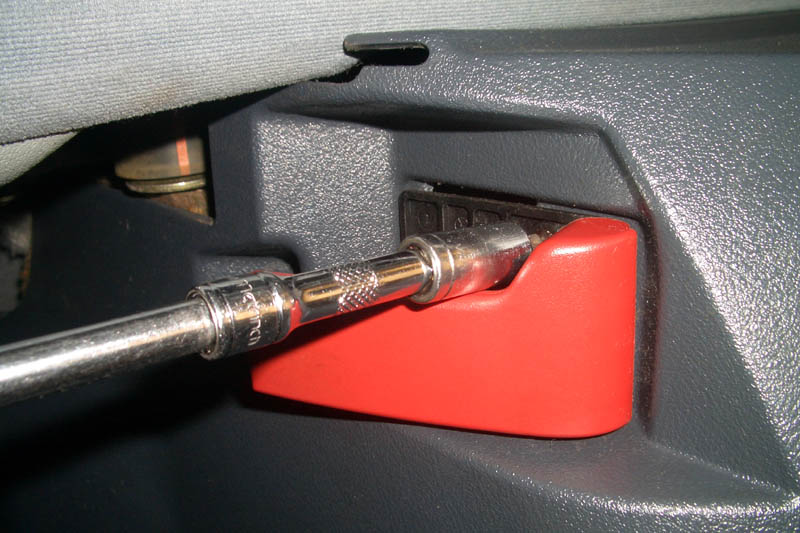
The final bolt is one that is deep within the dash, and requires an extension to access. You must remove a small circular clip, and this too is very fragile to take care when you remove it. I will advise you to be careful when trying to access this bolt because the hole for this wasn’t wide enough for my extension with the bit hex bit attached to it, so when I forced it through, I had a hell of a time getting the bit back out. Just keep that in mind. J I think it was an 8mm or less, not sure.
There are two clips below the steering wheel that you should have a good look at
before the thing falls out of its place, because they are quite odd and may give
you trouble when you put the panel back in. They kind of hold it in place,
joining it to the upper half of the dash, and making it look flush, so look for
those. Also, unplug the computer diagnostic umbilical cord by sliding the small
plastic piece over and pulling it out.
|
|
|
|
|
|
|
|
|
|
|
|
|
|
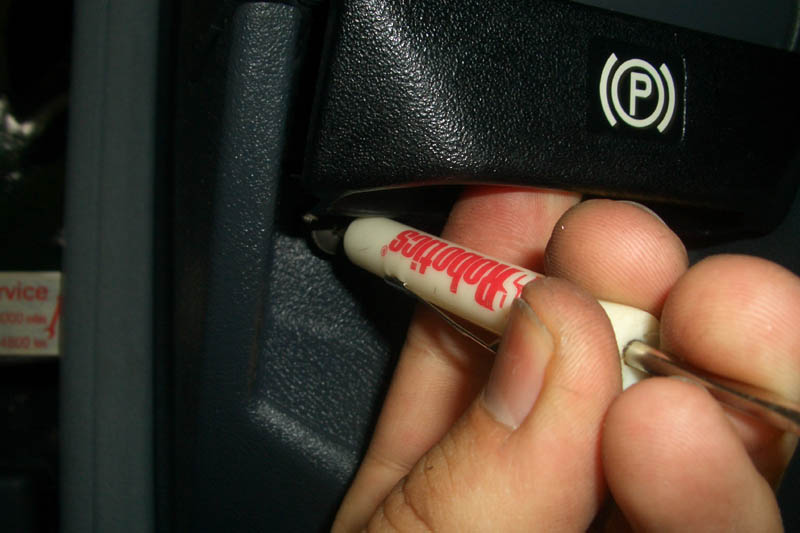
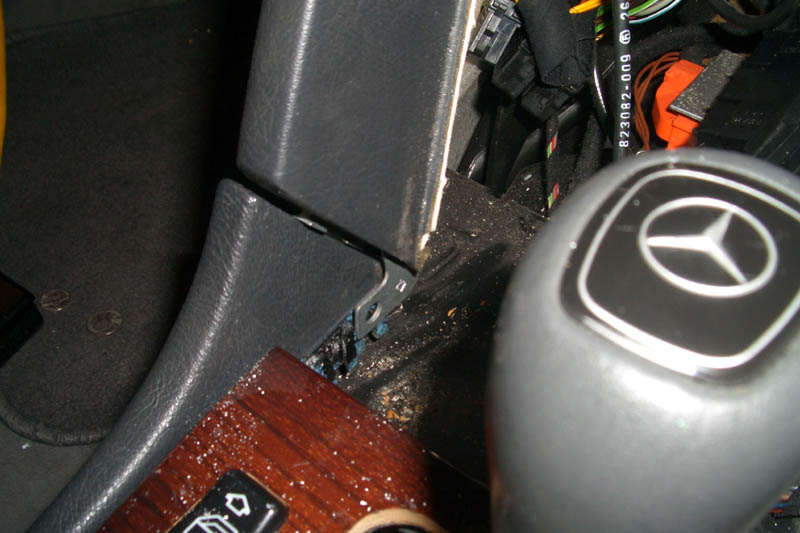
Parking brake release lever:
I don’t recall how to remove this, but there is a picture that shows one screw and a disconnected cable. I would suggest using a pair of needle nose pliers, and if you notice in the picture, I have a small mirror. I wish I could remember why… lol. I think the cable doesn’t come out right and you have to slide the mechanism past a locking clip or something peculiar like that. If anyone recalls, please feel free to add.
|
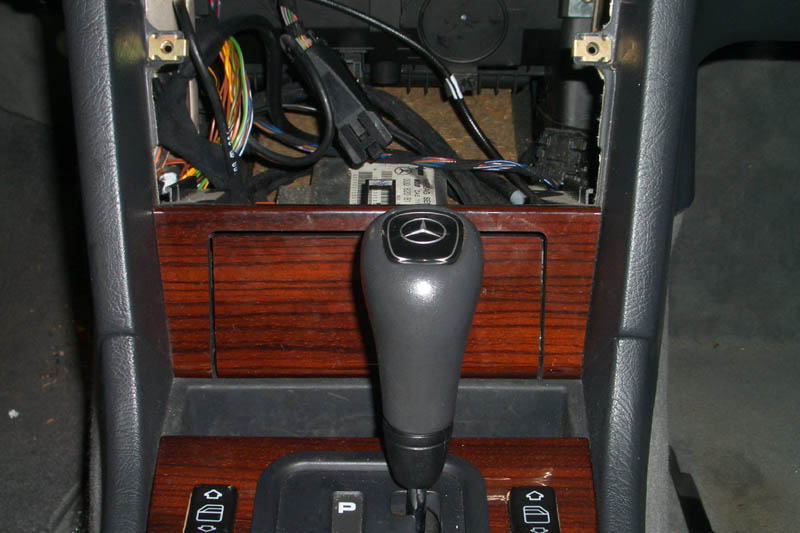
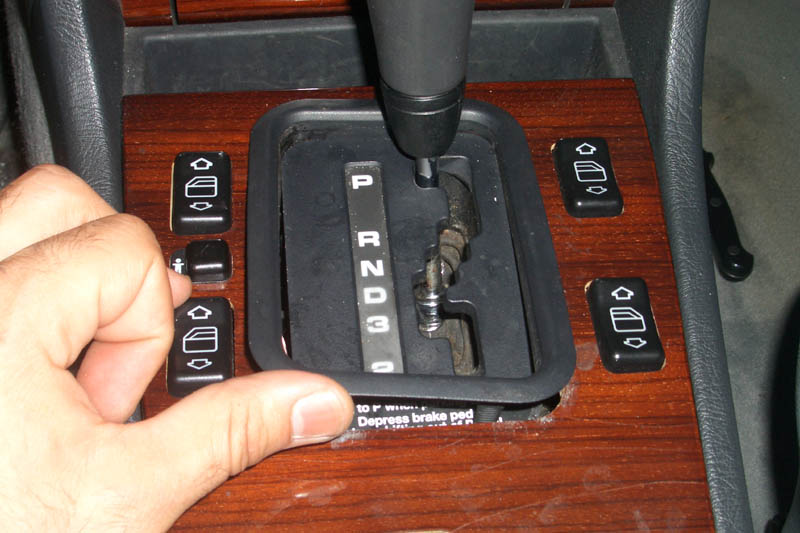
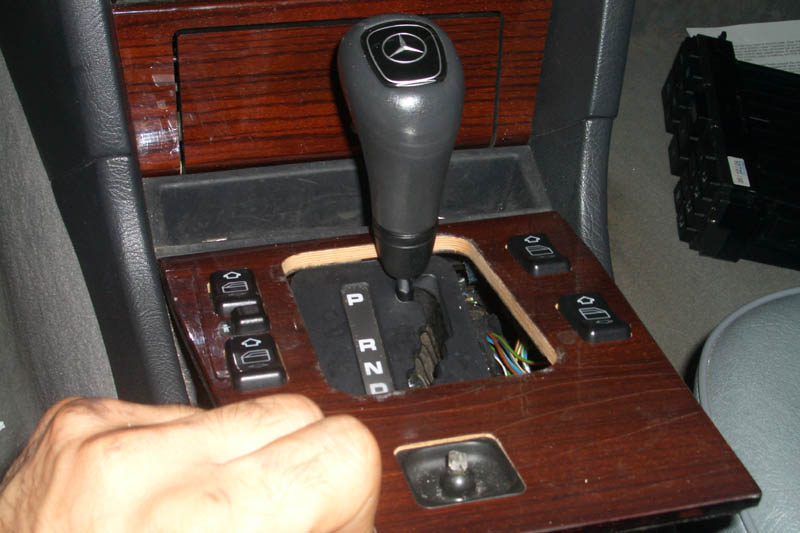
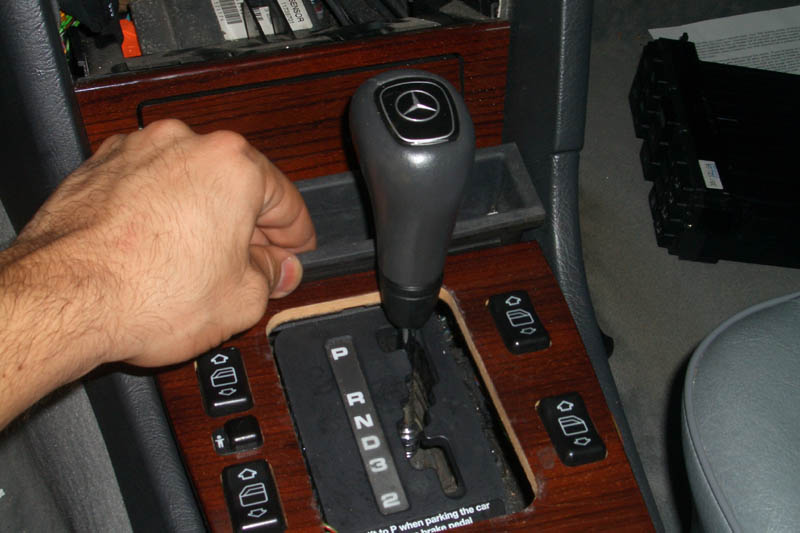
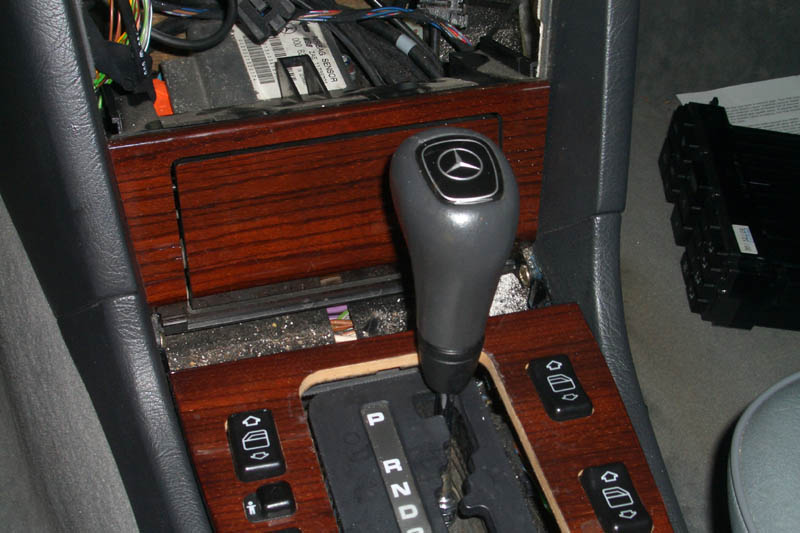
Gear-shifter Wood Trim and Tray:
This part is quite easy and should take minimal effort. The easiest way I found to do this is to reach with your fingers between the cup/change holder and the wood trim, underneath the wood trim, and pull up on it slightly to displace the plastic trim around the gear shifter. Once you notice the plastic come up a little, push back down on the wood to its normal resting position, and carefully shimmy the trim out. I guess before removing the wood trim, you can pull the small dirt-hugging rubber tray out first, then proceed to pull the wood up and out, slowly and carefully. It’s not entirely necessary to remove the wood trim, but I would recommend it if you don’t want to scratch it. The plugs should be easy to remove, just please, please don’t break the wood.
|
|
|
|
|
|
Ashtray:
From what appears in the picture, there should be two screws that must be removed before this will come out. I remember having a tough time with this as well, I think, so be prepared for elbow grease. I think I recall it flying out and some primal screaming, not sure though, just be patient. There might also be a wire attached to the back for the small light bulb, but I don’t recall that either. Someone, please fill in the blanks.
|
|
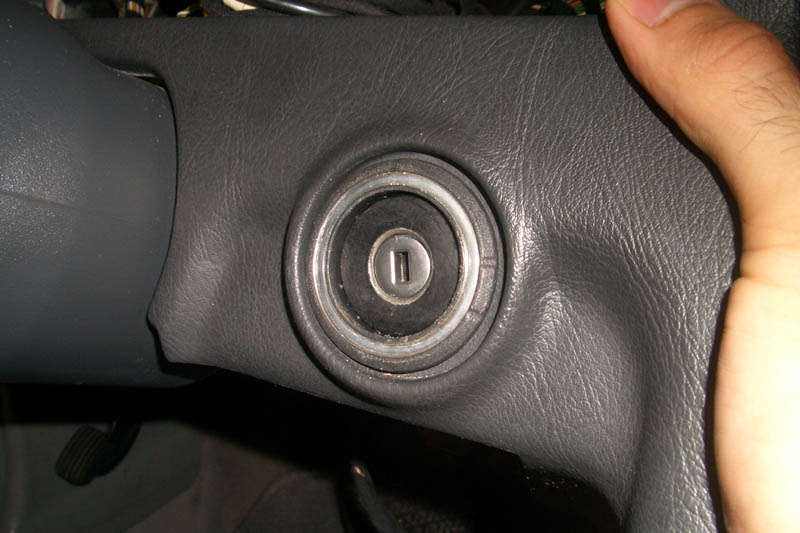
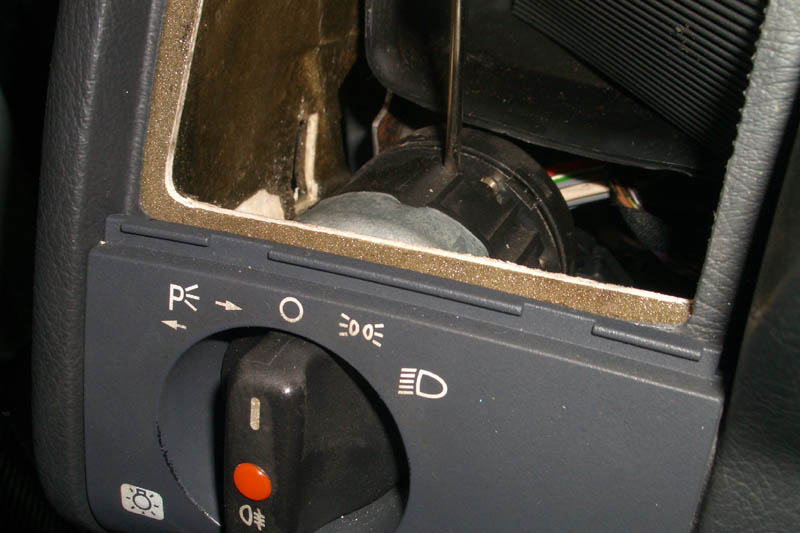
Ignition Ring/Cover:
This should either come off with a flathead or just a good tug on the dash to
separate it enough to let you pull it off.
|
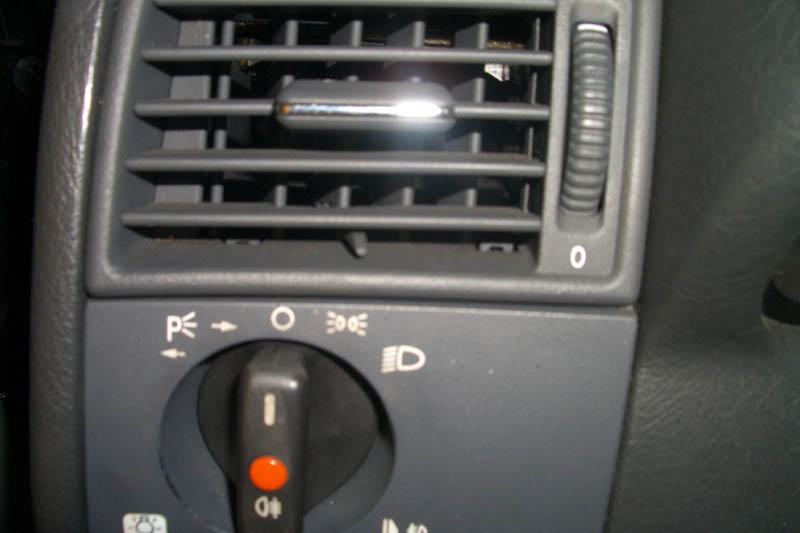
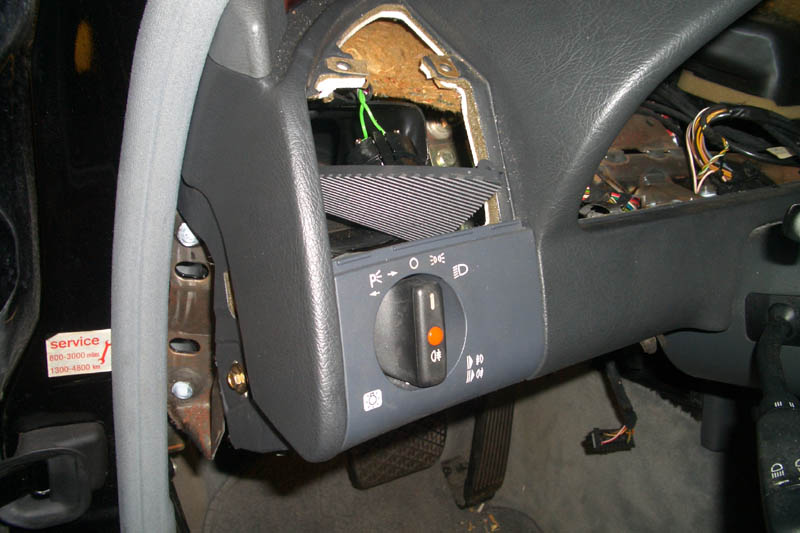
Headlight Control plug:
This part can be seen in the picture and easily removed with a flathead, by
accessing it from the vent opening. I would make sure you try to separate the
plug from unit along their correct halves. I remember rushing to this point and
trying to separate the wrong things almost breaking it, so have a decent look at
the pictures, and don’t be afraid to get on top of the dash.
|
|
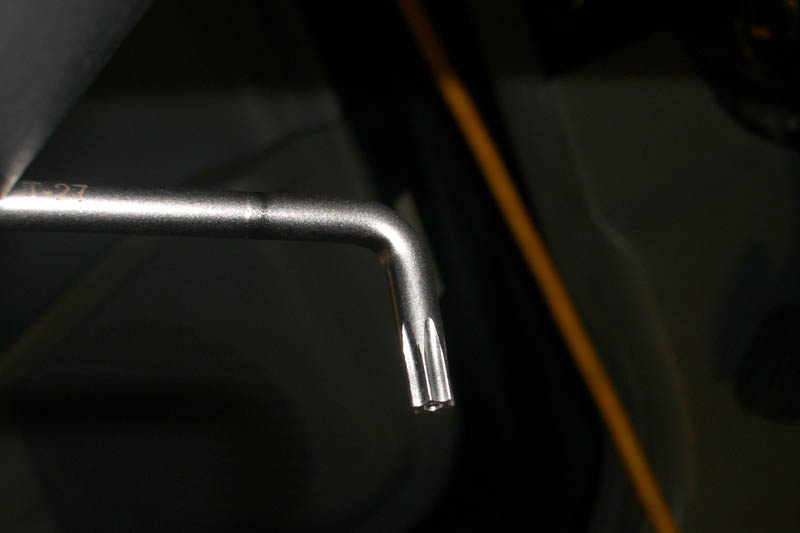
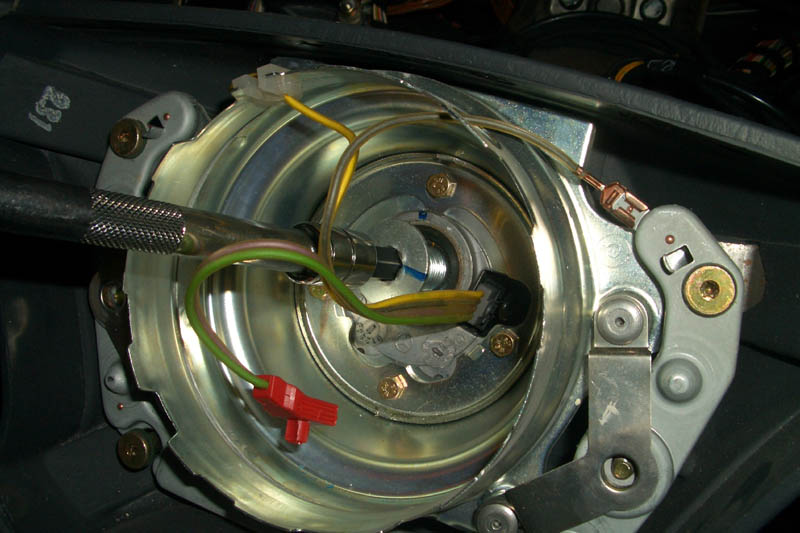
Steering Wheel:
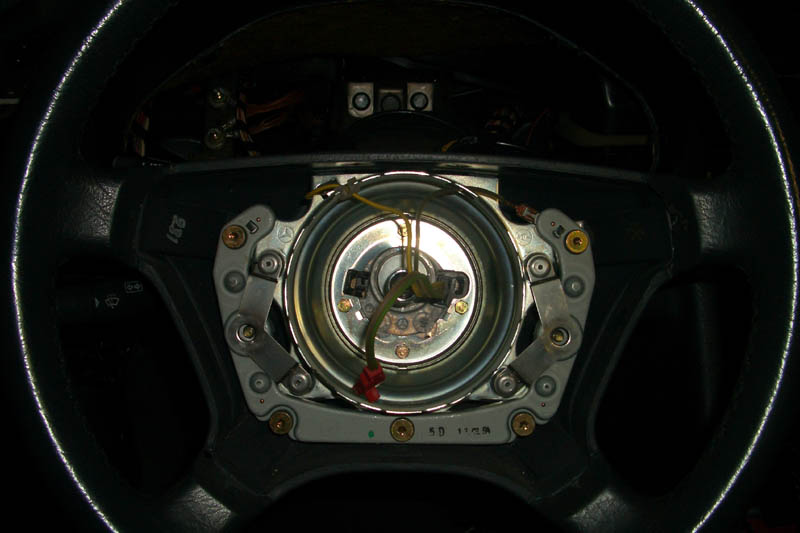
The steering wheel isn’t that hard to get off, but it needs to be done with specific tools. I would recommend using a T27 Torq Allen key (I think that’s what they are called). Behind the steering wheel, there are two deep holes that contain the screws that must be undone. These two screws hold the airbag section onto the wheel. I would recommend placing the long end of the Allen key in the hole, otherwise you probably won’t reach it. Attaching a small bit to an extension and placing it over the small end of the Allen key, you can use the extension as a large lever to break the bolt. Once loose, they should come out quickly. The airbag has just one plug that should come off easily. I’m not sure of the dangers of having this explode in your face, so just be careful and point it away from you.
I
don’t recall the exact size of the Allen bit used to remove the center bolt from
the steering wheel, but I do recall purchasing one for use on a socket wrench,
and using a breaker bar to loosen this bolt. I think the dealership has a
proper bit for this bolt, and if it’s cheap, get it. The last thing you want to
do is strip the head of this bolt at this point in time, and that’s what I
almost did. If you do go with an AutoZone hex socket, just make sure to apply
pressure straight and proper, and don’t force it to destroy the bolt. Take a
look at my pictures and you can somewhat see what I mean.
|
|
|
|
|
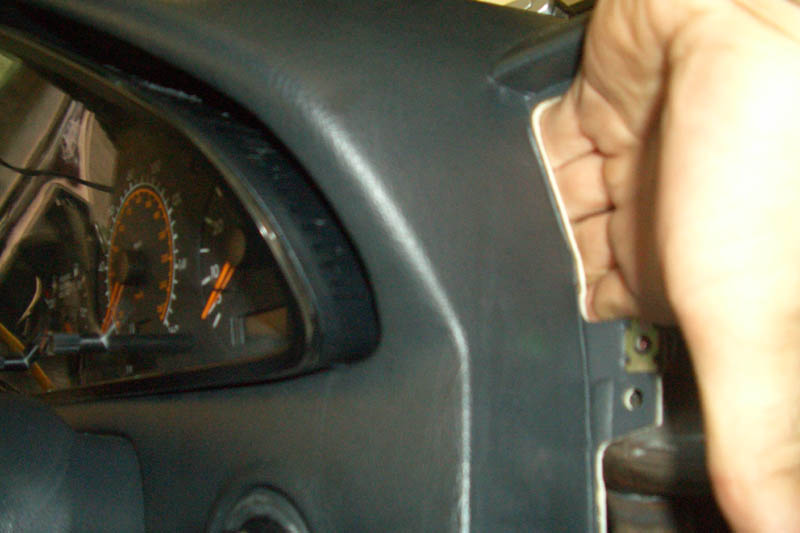
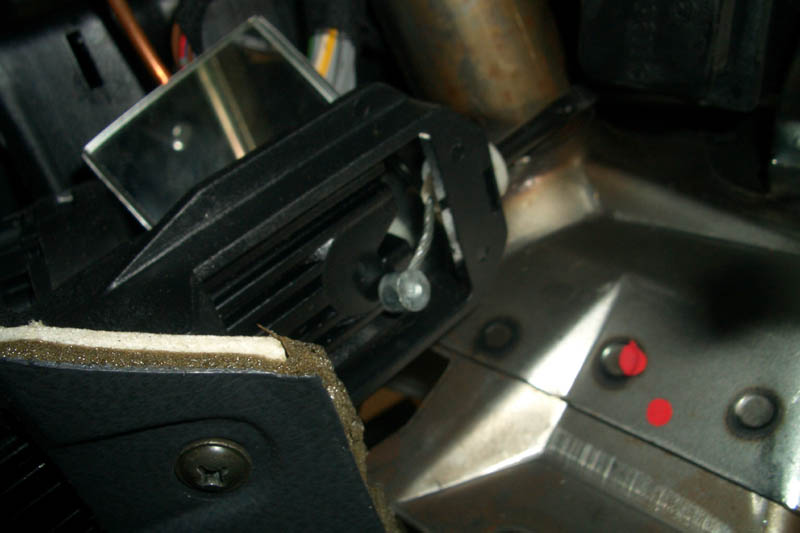
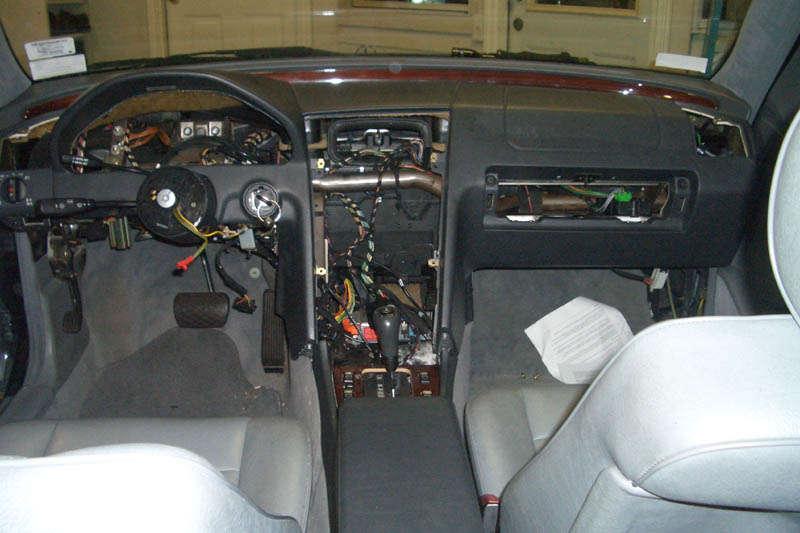
Separating the upper from the lower dash:
This part involves some muscle, and a little impatience. I think there is a
smarter way to do this, but I had run out of patience with this project, so I
didn’t bother removing the lower transmission part of the dash. To separate the
upper dash from the lower dash, there are these metal wedges that join the two
to keep them in place. They are very sturdy and will require that you exert a
lot of force by pushing the top half towards the firewall until they separate.
I did not find a comfortable place for them to rest when they were out, so you
might have to let them kind of sit wherever they can once they’re separated.
|
|
|
|
|
Remaining Dashboard bolts:
There are two bolts up along the defroster by the window that must be removed.
I used a flathead to remove the plastic that covered the bolt. Then, I used a
neat tool from my Metwrench set that’s like a tiny hand wrench. This made it
easier to get to these hard to reach bolts, and get them out. There were a few
more bolts around the dashboard, and glove box that had to be removed before the
dash was loose.
|
|
|
|
|
|
|
|
Dash Removal Comments:
Around here, I will admit it gets hazy. After about 2 days in blistering heat, I was pretty frustrated, and ready to get this thing out, so after here, I don’t recall if there were any more bolts to remove. Also, I stopped taking pictures after this point. Sorry all, I wish I could see it with everything removed too. I will say that it does take some good maneuvering skills, and if you can get another person to help, do it. Unfortunately, I didn’t feel like waiting, so I yanked it out myself, lol.
Also, if you can figure out a way to remove the indicator or more specifically, the cruise control arm, that will help tremendously. I put an awful lot of stress on the cruise control arm and wouldn’t have been surprised if the dash broke it, but alas, it didn’t.
Also, there are large black tubes that the defroster hooks up to that deliver the air to the dashboard that will be attached in the back. These must be aligned properly when you put the dash back in, so pay some attention to these as well.
Replacing the billows:
How hard this will be is pretty dependant on which ones went out, and where they may be located. One of mine was very easy to get to, so before I changed it out, I hooked all the lines back up to the vacuum control unit, ran the fan system, and watched as the billow lost vacuum, the arm slowly moved back, and the vent closed.
I then removed the old billow by using a pair of needle nose pliers to get the arms off, removed the vacuum lines from either side of the billow, and removed it from its holding bracket. After replacing it with the new billow and hooking everything up, I was able to test the appropriate vacuum line that connects to that billow with the vacuum pump to make sure it held sufficient vacuum, which it did!!! I then hooked the lines back up to the control unit, and tested the whole system, and the damn thing worked.
Although this
billow was now fixed, I had another that wasn’t very easy to get to that still
needed replacing. This one was situated close to the firewall, behind the
passenger airbag, and was almost inaccessible. To get this one out required
some time, patience, a small mirror to see all the angles, and some needle nose
pliers. You want to make sure you get the billow placed correctly, and the arm
back onto it, so that it can open and close the vent properly.
|
|
|
Now, if your system works properly, put everything back together in just about the reverse order. Congratulations and Good Luck!
Temporary solutions to fix the center vent problem:
Try setting the control unit to air from the front vents (center and side), then proceed by driving at a NORMAL speed (in a straight path), putting the vehicle in neutral, turning the car completely off, then quickly turning it back on, all the while in motion, and placing it back into drive. This would create a build up in pressure, I assume, and get the vents to change order. It used to get the air blowing out of my front vents for the remainder of the time I had my vehicle on. It may or may not work for some people.
Hosted by...
Kropf.Computer Services, Inc.
Internet Registered since 1991 and
"Keeping business plugged in...
...to the Whole-Wide-World!"